Hacking the Nokia Fastmile
Sometimes the best candidate for security research is the one right in front of you. This post summarises research conducted on Nokia Fastmile devices between 2021 and 2023.

Optus in Australia used to bundle a 5G gateway called the Nokia Fastmile (1st gen) together with their home 5G broadband packages.
As of 2024, these devices are no longer used by Optus and have become quite affordable on the second-hand market. They serve as good candidates for backups to fixed-line connections or as replacements for portable devices like Netgear Nighthawks. With their directional antennas, they should offer better reception.
Key Findings
If you're reading this article, you might be primarily interested in the key findings. To save you time, I've summarised the most important points from the original research below.
The Device
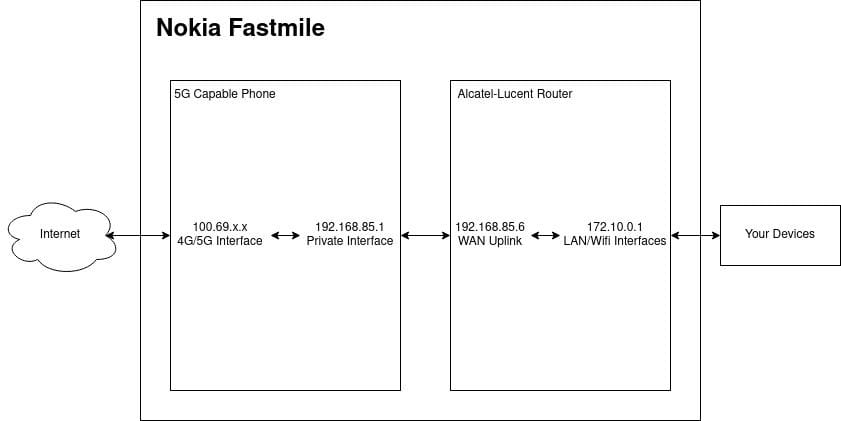
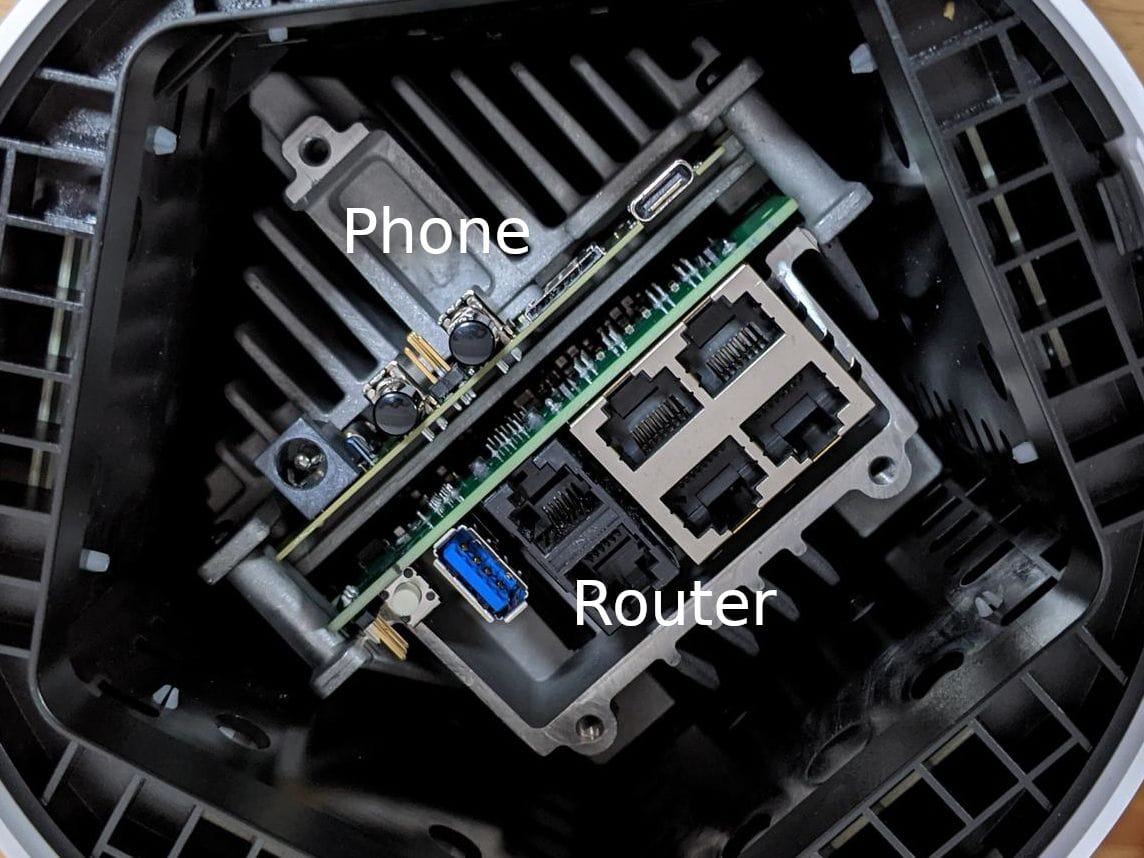
These 1st gen Nokia Fastmiles are actually made up of 2 separate pieces of hardware with an interconnect between them.
It's effectively a 5G capable Android phone (Snapdragon 855 CPU - the Pixel 4 also uses this chip) + a traditional Nokia (Alcatel-Lucent) router.

The router utilises a 5G phone as an uplink to provide internet access to its clients.
Carrier Lock
With the devices I've encountered, there has been no carrier lock on any of them.
If your device has a carrier lock you may have to do some of your own research to see if this can be bypassed. I don't have any insight about this and also do not use these devices anymore.
Device Firmware
I've taken the liberty of downloading several firmware versions for the device. Later versions are definitely more stable, but they also patch vulnerabilities that facilitate easier rooting. If you're aiming to obtain root access, be sure to do so before upgrading the firmware.
| Software Version | Firmware File Name | UBoot | Notes |
|---|---|---|---|
| 3TG00118ABGA31 | 5GGW_D010600B94T0101E0031_ota.tar.gz | U-Boot Aug-09-2022--20:45:33 | Admin password F1P3@s+6!H |
| 3TG00118ABGA17 | 5GGW_D010600B94T0101E0017_ota.tar.gz | U-Boot Aug-12-2021--21:59:07 | ADB disabled, Admin password Nq+L5st7o |
| 3TG00118ABAD52 | 5GGW_D010003B37T0101E0052_ota.tar.gz | U-Boot Sep-27-2020--14:00:53 | Can upgrade to ABGA17 |
| 3TG00118ABAC54 | ? | U-Boot Oct-24-2019--10:32:30 | |
| ? | 5GGW_D010004B41T0101E0053_ota.tar.gz | ? | |
| 3TG00118CBAB08 | ? | ? | Can upgrade to ABAD52 |
| 3TG00118BBAB83 | ? | U-Boot Aug-29-2019--06:31:55 | Cannot upgrade to ABAD52 |
| 3TG00118BBAA55 | ? | U-Boot Jun-21-2019--04:30:38 | Cannot upgrade to ABAD52 |
Getting 'SuperAdmin' WebUI Access
The WebUI has a superadmin privilege level which has access to additional advanced functionality. I found two ways to access this.
Authenticated - Privilege Escalation: CVE-2021-45896
In firmware versions prior to 3TG00118ABAD52, I found that access control is not enforced.
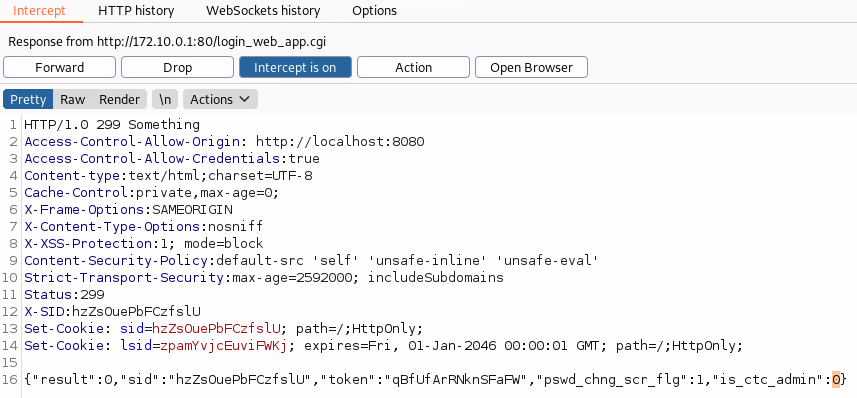
When logging in, a call is made to POST /login_web_app.cgi.
If you intercept the response you will see that there is a variable called "is_ctc_admin".

If you change this in the response to 1 additional UI elements will be rendered. The vulnerability is a classic access control issue where authorisation is handled only on the client side.
Hardcoded Credentials - CVE-2022-36222
All Fastmile devices with that firmware version 3TG00118ABGA17 or below have a 'admin' password of Nq+L5st7o. Use the username 'admin'.
Versions after that firmware version appear to have a password of F1P3@s+6!H however I'm unable to validate this.
Getting Root
As this is 2 devices in 1, you need to obtain root twice.
Android Root
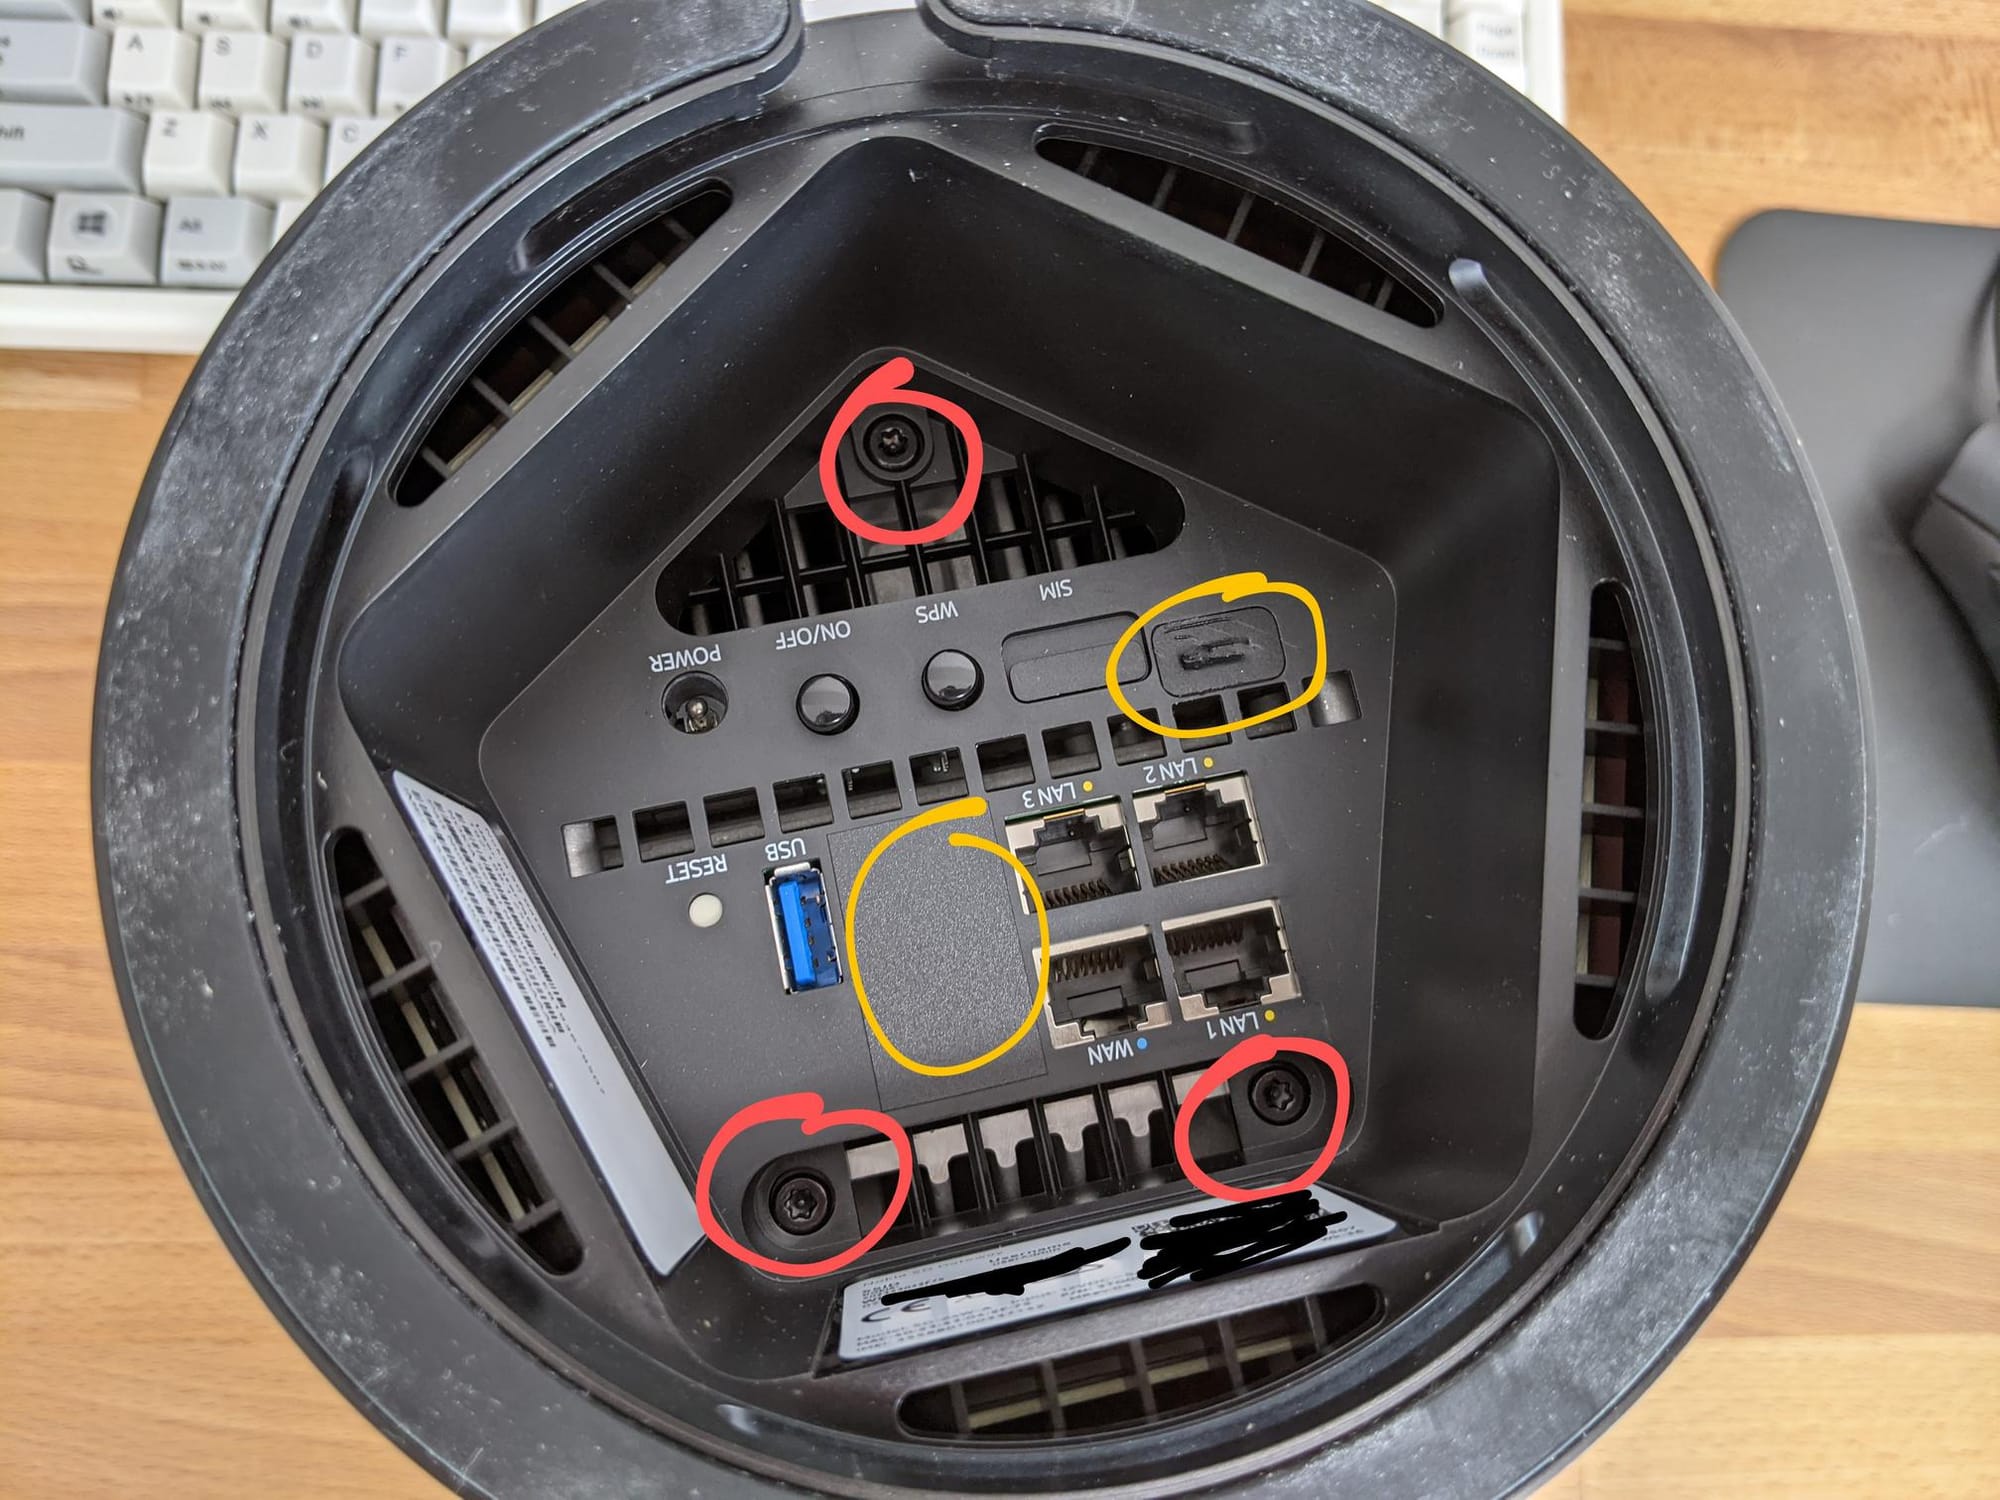
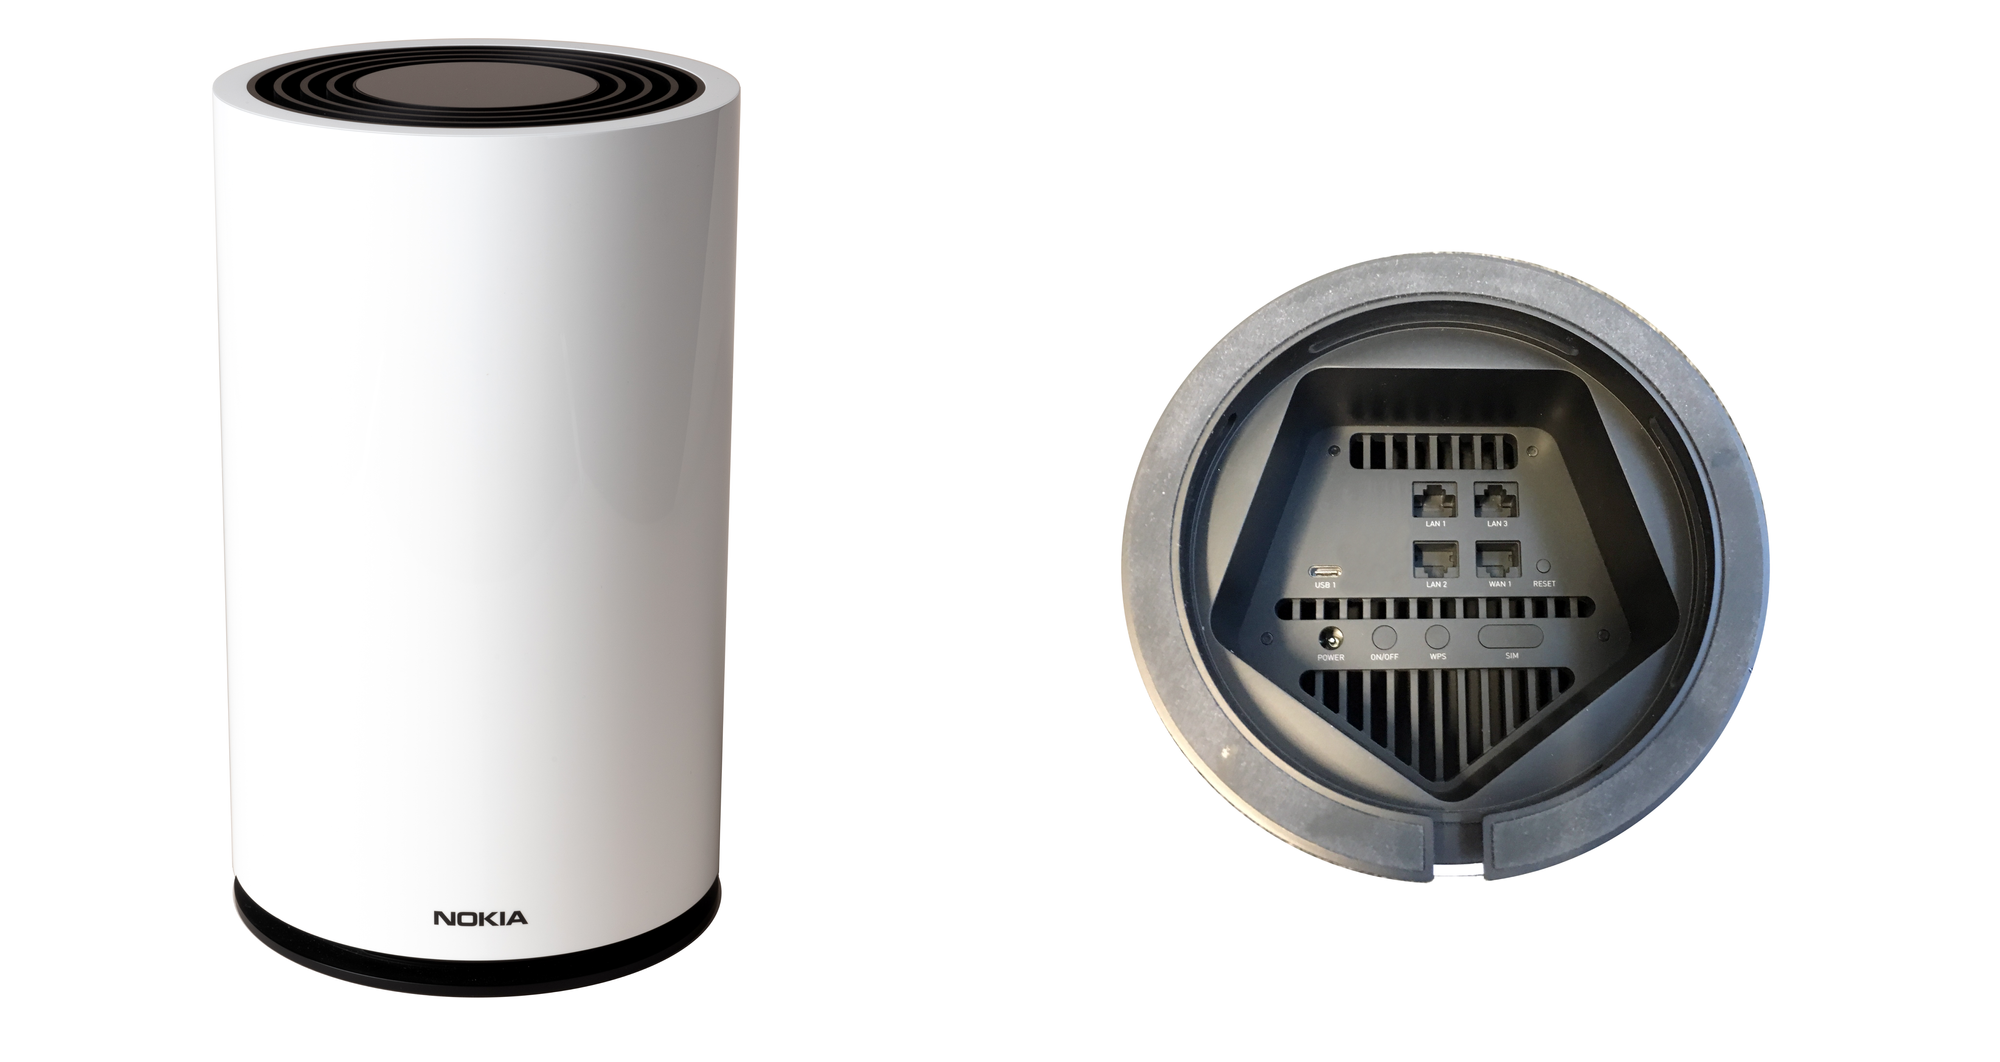
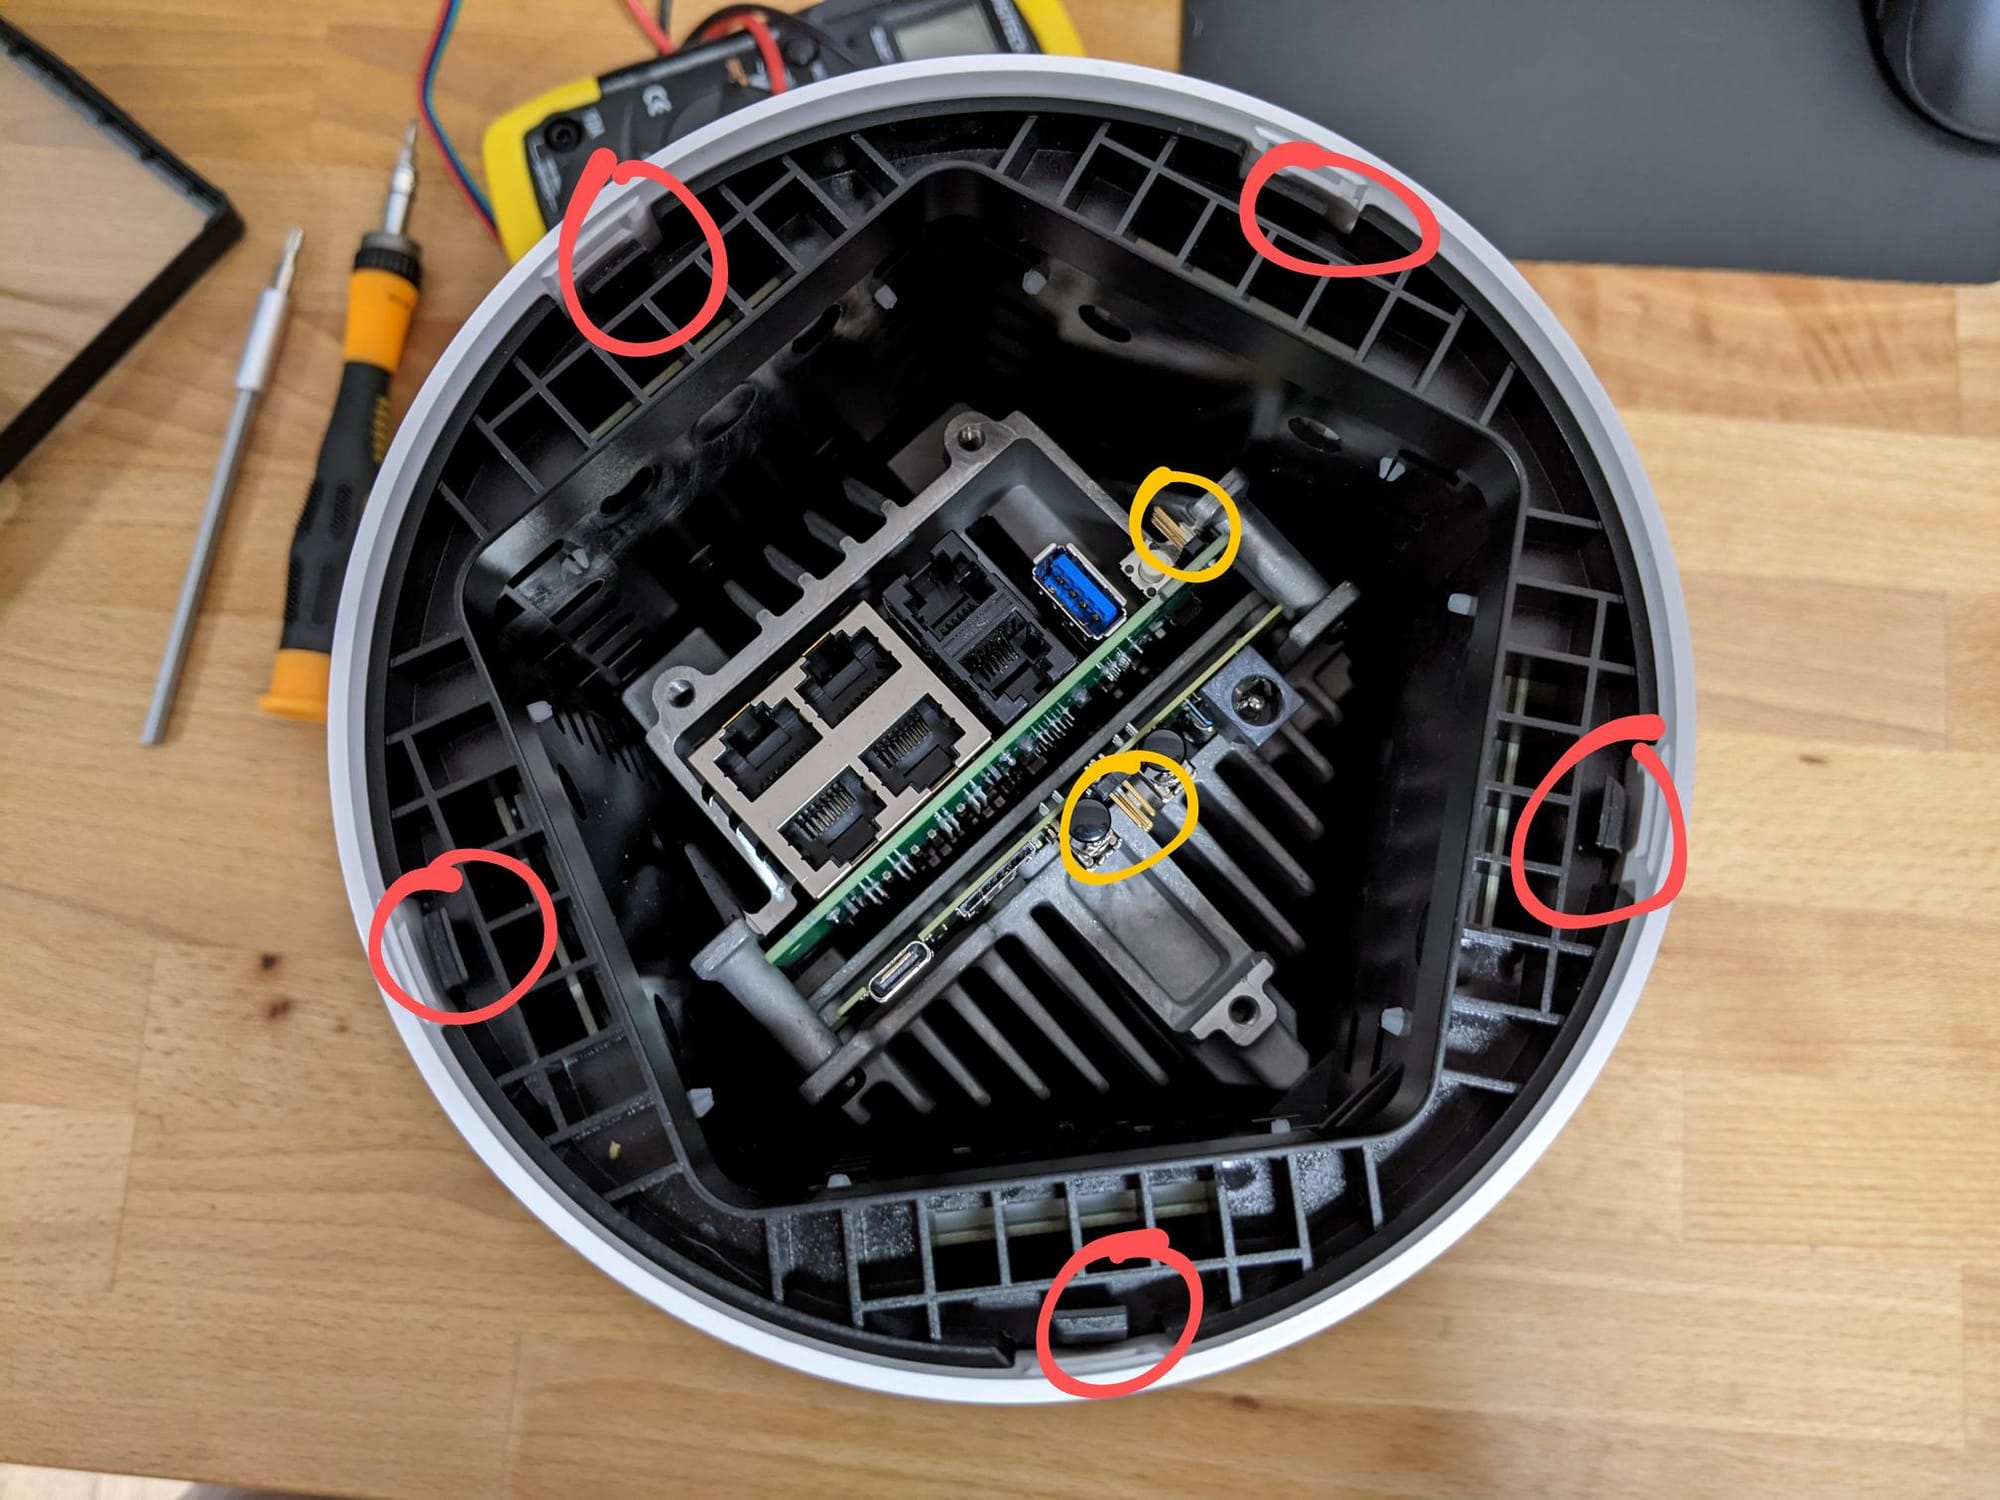
The device has a hidden USB-C port on it (top right circled in yellow on the photo). In older firmware versions, ADB is enabled.
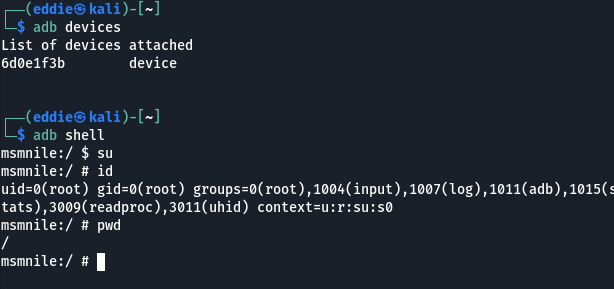
Plug in a USB-C cable and run adb shell.

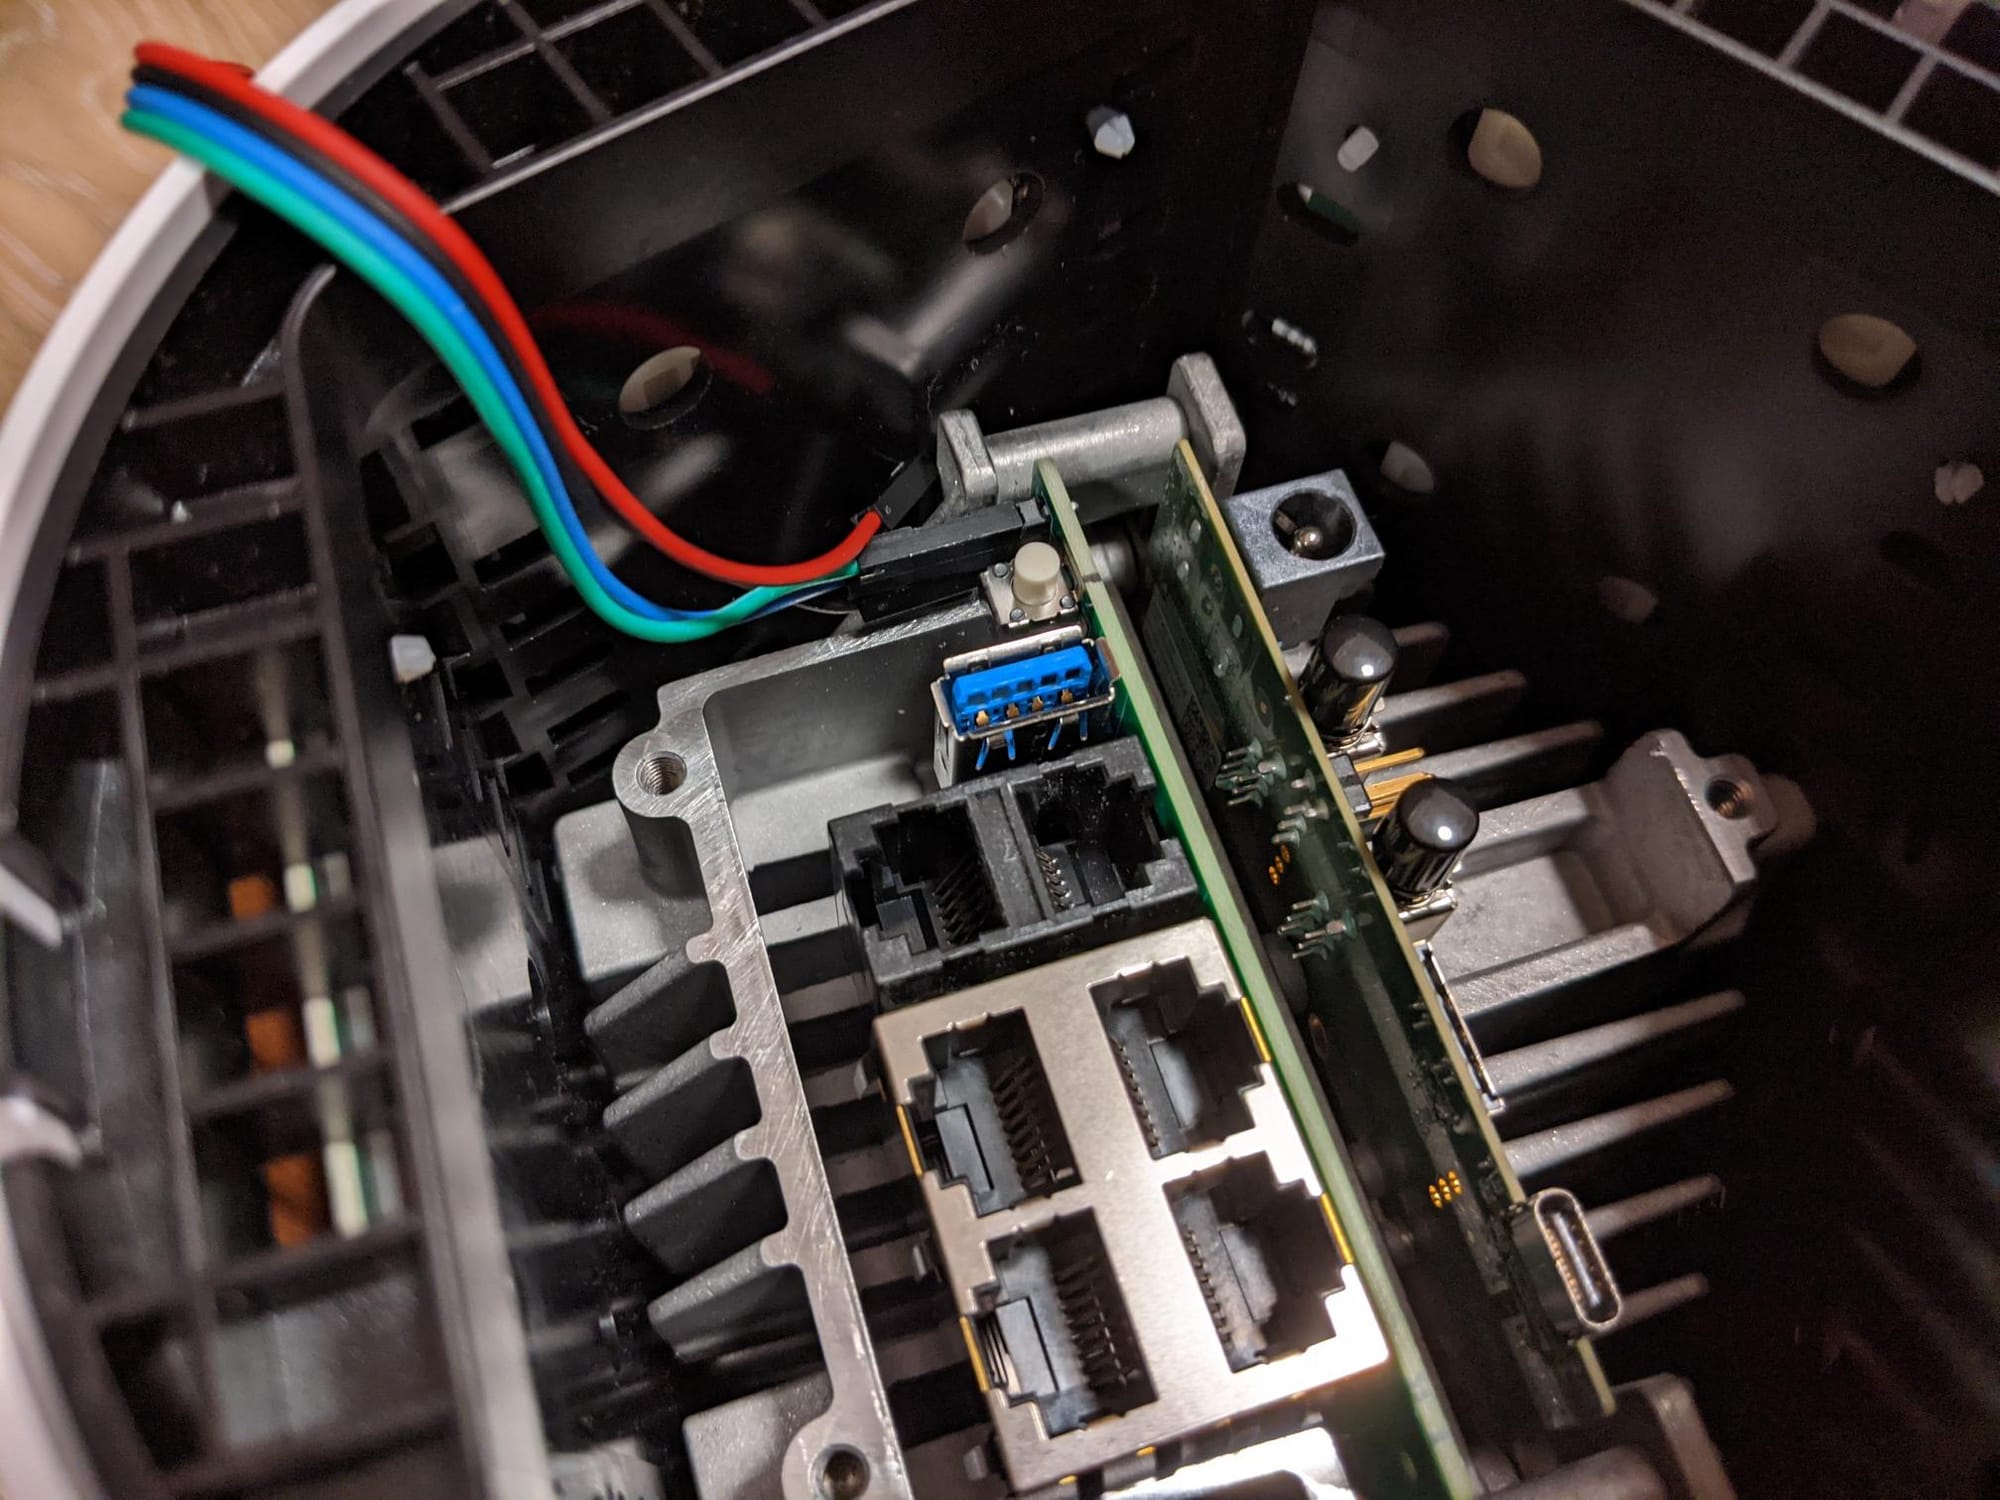
In later firmware versions, ADB is disabled but can be re-enabled via Serial. These terminals are 1.8v logic level and the pins from inside to out are RX, TX, and ground with a baud rate of 115200.
Router Root
In older versions of Fastmile firmware, when signed into the web UI via the 'admin' account, you can access a configuration backup/restore function.
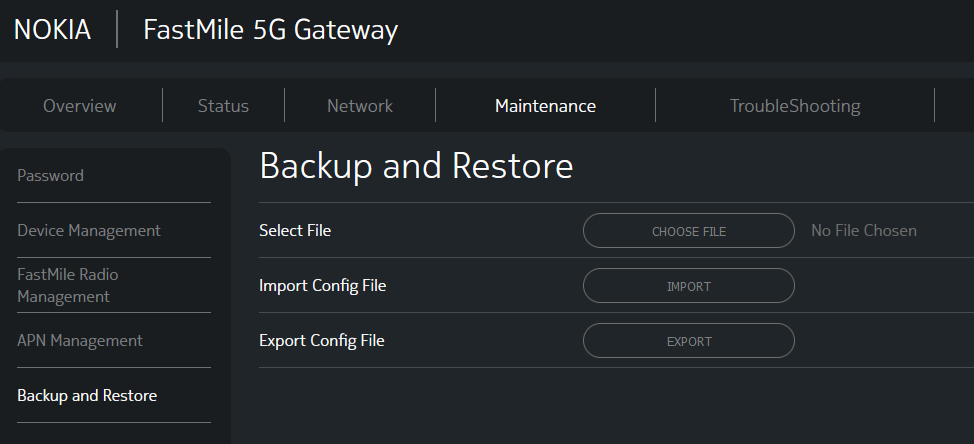
These backups are encrypted however @thedroidgeek has written a tool for other Nokia routers which also works for the Fastmile: https://gist.github.com/thedroidgeek/80c379aa43b71015d71da130f85a435a
Using the configuration tool, you need to modify two sections:
- Set
TelnetEnableto true. - Enable the
TelnetSshAccount, and set the UserName toONTUSER.- The password for this looks like gibberish but the script linked previously can also be used to decode/generate valid passwords.

Upon application of these configuration changes, you should be able to SSH to the device with your password.
Unfortunately, in newer versions of firmware, changing this configuration is much more involved. You'll likely need to:
- Dump the firmware via serial.
- Make changes to the firmware image.
- Write it back to the device.
Original Research
Part 1
As a part of my 5G home internet offering, Optus bundles a 5G gateway called the Nokia Fastmile. The same device seems to be shipped by T-Mobile for their 5G offering and is passionately known as the 'trashcan' in r/tmobileisp.
Naturally, the first thing I tried to do is to obtain root access on it.
Finding a Privilege Escalation Bug
EDIT: This has been assigned CVE-2021-45896.
Immediately, the first thing I noticed is that the provided userAdmin credentials printed on the bottom of the device seem to be a low level account.
Taking a peak at the requests going on when logging in immediately reveals an authenticated privilege escalation vulnerability. This likely also affects other Nokia devices. My firmware version: 3TG00118ABAD52.
When logging in, a call is made to POST /login_web_app.cgi.
If you intercept the response you will see that there is a variable called "is_ctc_admin".
If you change this in the response to 1 you get access to additional functionality and full admin. The vulnerability is a classic access control issue where authorisation is handled only on the client side.
Now we have access to an additional tab but also more functionality in some existing tabs.

Changing Config
Doing some Googling I came across @droidgeeks' writeup about figuring out the format of Nokia's configuration file format and writing a tool to unpack, and pack configuration files so that you can make changes that aren't available through the web interface.

The tool he wrote also works for the Nokia Fastmile: https://gist.github.com/thedroidgeek/80c379aa43b71015d71da130f85a435a
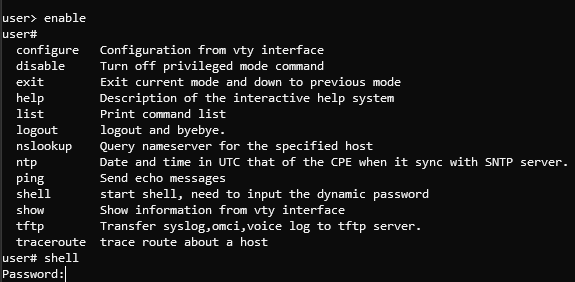
Following the write-up gets us all the way to SSH/Telnet access to the device however we are stopped by this annoying password prompt for shell access.
None of the passwords in the configuration file work for this shell password.
Looking at Hardware
randomsrvapps over at Whirlpool seems to have managed to get a trivial root shell via UART/ADB revealing that the device is Android based? Lets verify this.
Flipping the device over we see some ports that seem to be covered (circled in yellow on the photo).

These stickers can only be uncovered from the rear as the stickers they used are quite strong. By undoing circled bolts in red (Torx T15H) and removing the sim card, the feet come off and we can poke out the stickers.
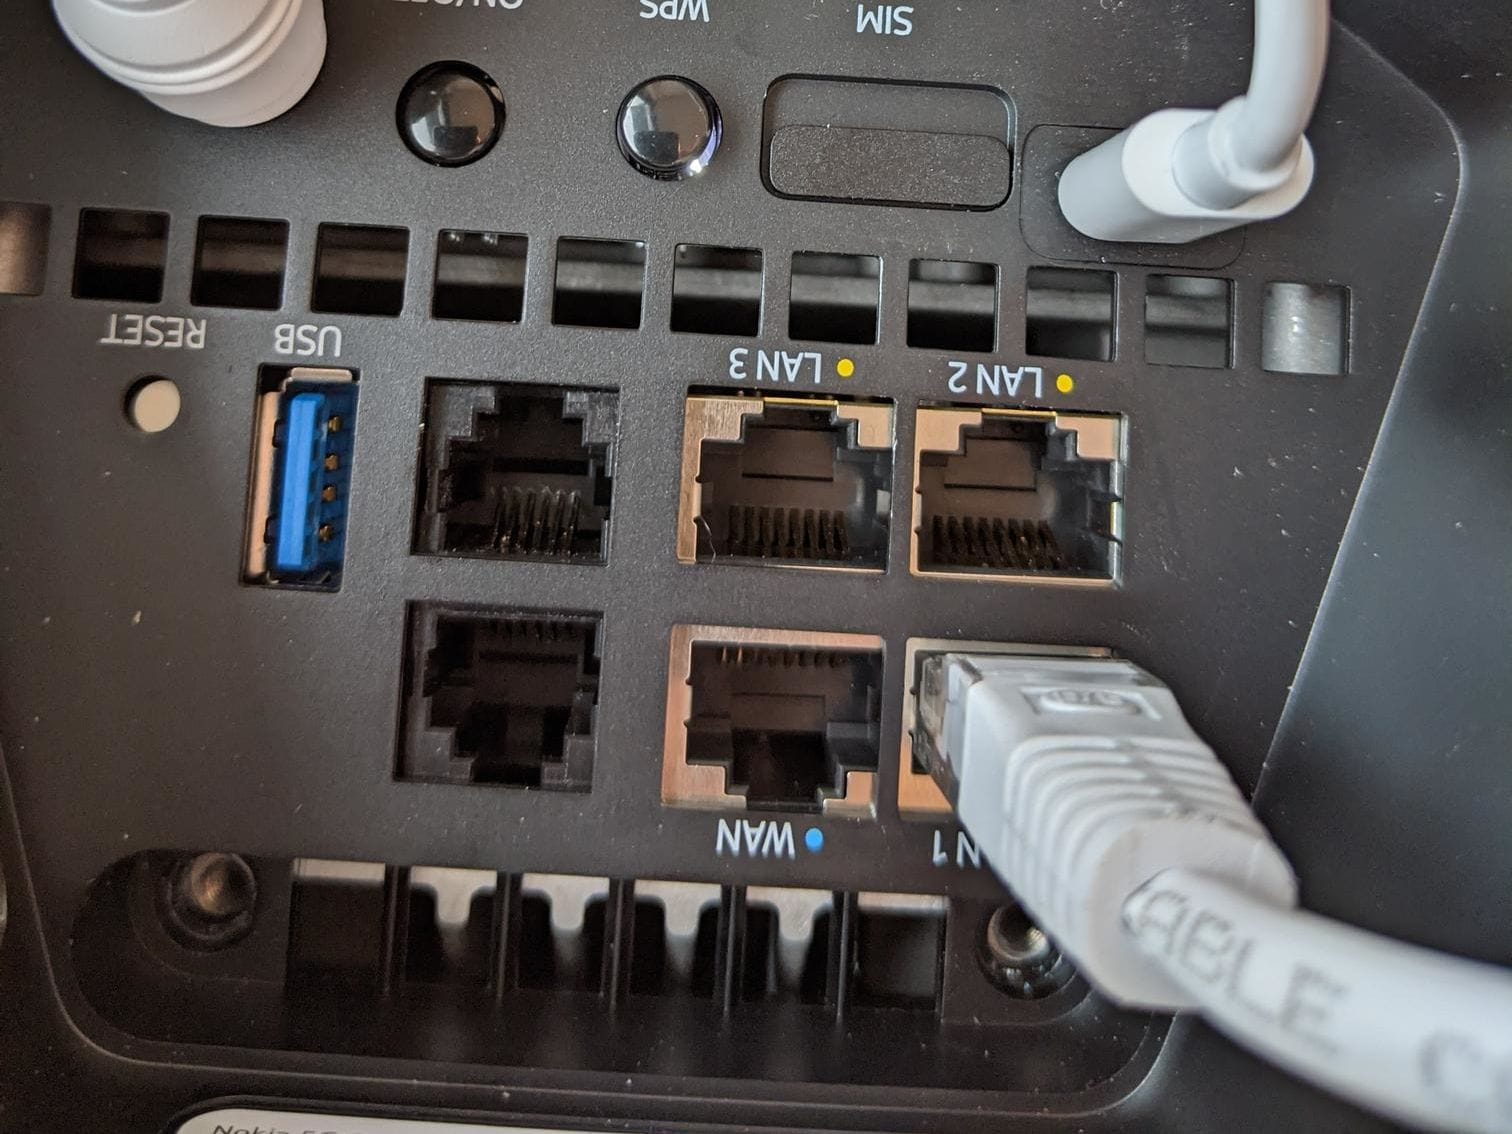
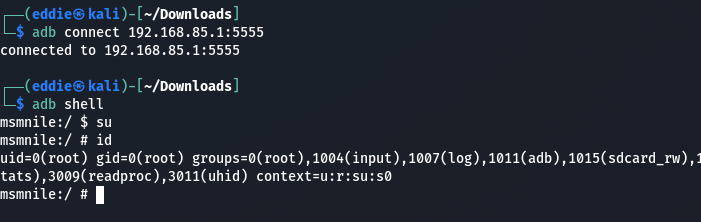
As per the thread, plugging into the USB-C port and running ADB shell gives us an immediate root shell on the device.
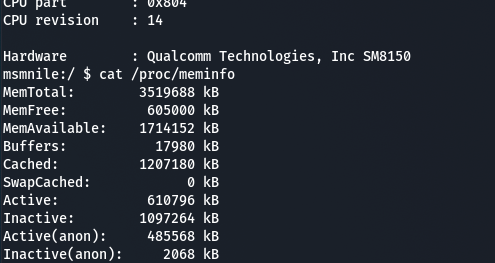
Interestingly it has a Snapdragon 855 in it, the same processor that was in previous generation flagships like the Google Pixel 4.
I also confirmed that you can get this same console access by plugging into the pins outlined in the thread. These terminals are 1.8v logic level and the pins from inside to out are RX, TX, and ground with a baud rate of 115200.

Having a poke around via ADB shell reveals some oddities.
The most noteworthy being that the IP addressing scheme of my local network configured via the WEB-UI (172.10.0.0/24) is non-existent and some random private subnet 192.168.85.0/24 shows up.
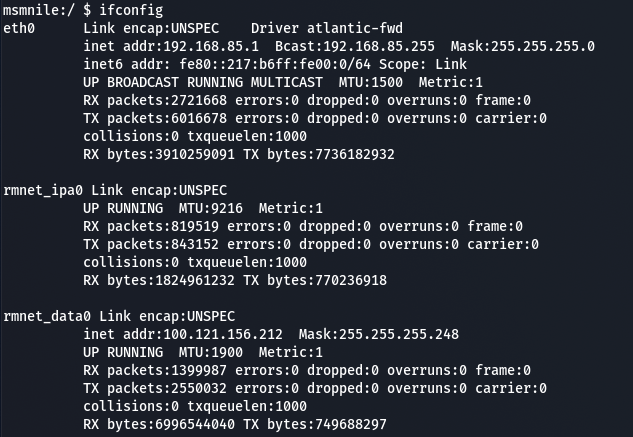
Performing a traceroute from my local machine we see traffic get routed through this 192.168.85.1 gateway as well. The first hop is my pfsense firewall (I'm running double NAT).

This can also be verified by performing a tcpdump with a filter on the Fastmile whilst pinging 9.9.9.9.
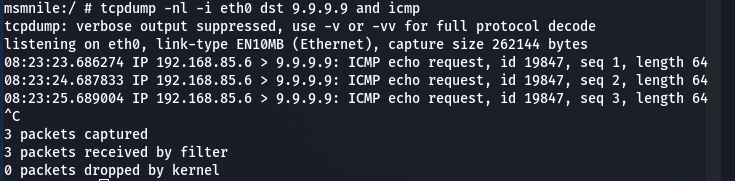
Why is our IP address 192.168.85.6??
I immediately copied over a precompiled binary of busybox onto the Fastmile to try to run ARP.
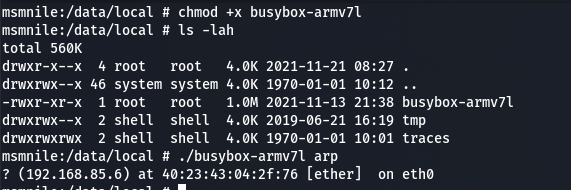
Then the realisation came.
Two Devices in One Box
Nokia have basically taped a 5G capable phone to one of their old Alcatel-Lucent routers and shipped it in a cylindrical box. This also explains why the configuration modification tool earlier worked flawlessly.
Having root on the Android side doesn't help at all with getting root on the router side!
Using this knowledge we can also enable remote Android debugging by first adding a firewall rule.
iptables -I INPUT 1 -s 192.168.85.6 -j ACCEPT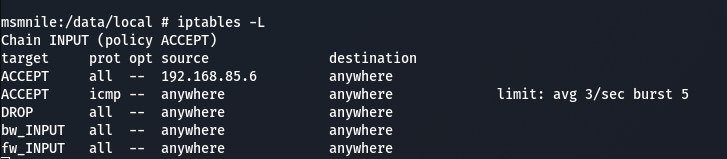
Enabling remote debugging on a port.
adb tcpip 5555 //While connected via USB.
Then connecting remotely without having to be tethered to the device.
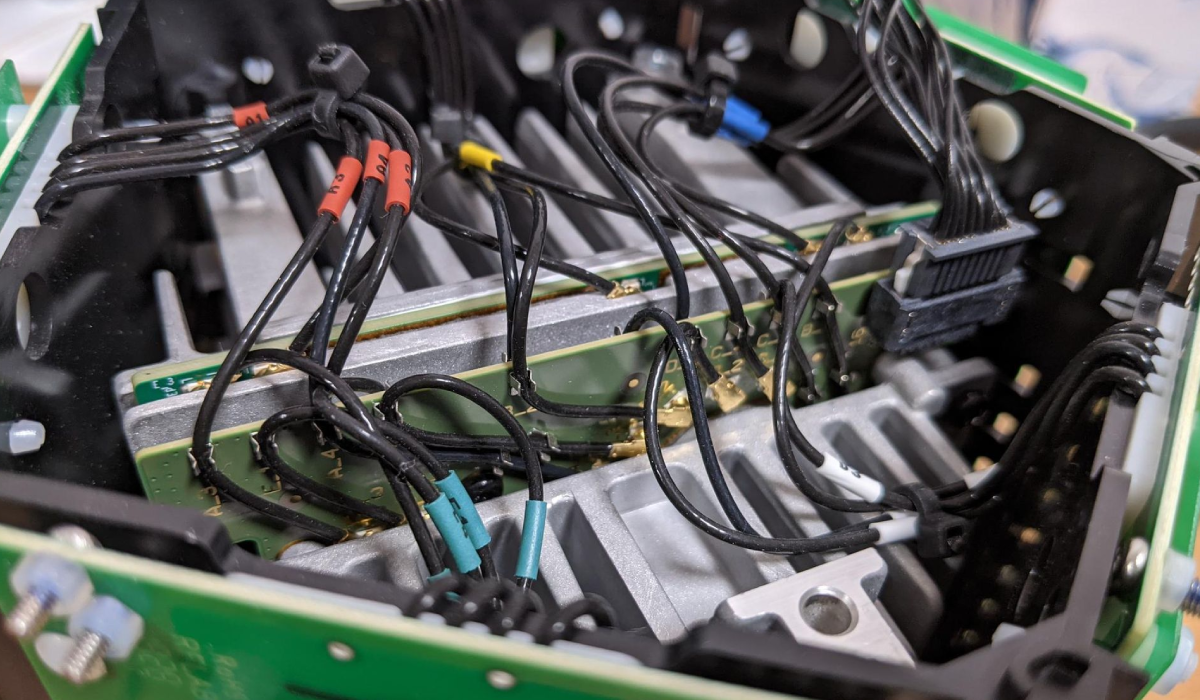
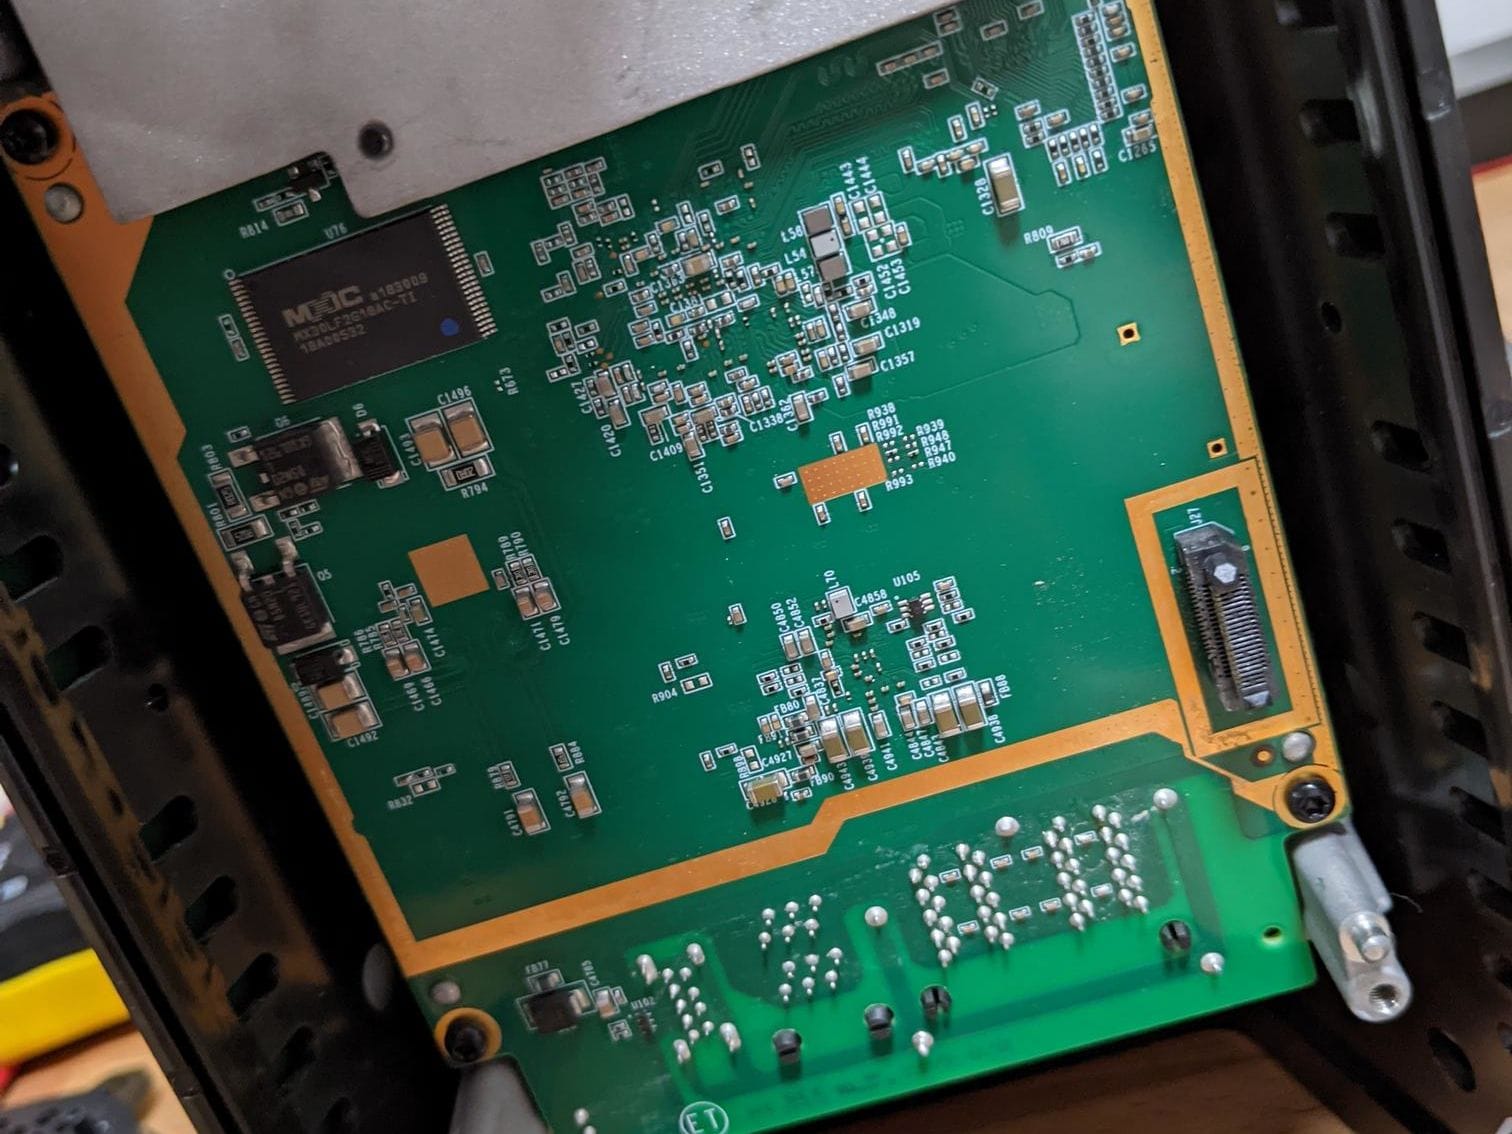
Looking back at the physical device again you can even see two different PCB types.
UART pins are also provided for the router side that are easily accessible. These pins are 3.3v logic level and the pins from inside out are ground, RX, TX with a baud rate of 115200.
Letting it boot whilst connected via UART drops us into the same restricted shell that we had earlier via SSH where we don't know the 'shell' password. Not helpful.
Part 2
I ordered a second Nokia Fastmile!
After receiving my second device, I noticed that the second device was on a newer firmware version with the authenticated privilege escalation vulnerability patched out.
Identical Super Admin Passwords
This locks us out of the configuration backup/restore utility.
Luckily, there's a higher privileged account with the same default password that seems to be baked into every Optus shipped device.
<WebAccount. n="WebAccount" t="staticObject">
    <Enable rw="RW" t="boolean" v="True"></Enable>
    <Alias t="string" ml="64" rw="RW" dv="cpe-NokiaAlias2" v="cpe-NokiaAlias2"></Alias>
    <Priority max="10" min="1" rw="RW" t="unsignedInt" v="1"></Priority>
    <UserName ml="64" rw="RW" t="string" v="admin"></UserName>
    <Password ml="64" rw="RW" t="string" v="7hrGZUG0NX48jHEq3+Twog==" ealgo="ab"></Password>
    <PresetPassword ml="64" rw="RW" t="string" v="7hrGZUG0NX48jHEq3+Twog==" ealgo="ab"></PresetPassword>
</WebAccount.>
Using the same tricks from last time the password 'decrypts' to Nq+L5st7o with the username being admin.
At least in my case, the password I obtained from my first device also worked on my second device.
UDPATE: Informed Nokia and as of U-Boot Aug-09-2022--20:45:33 patch version 3TG00118ABGA31 this is no longer available.
UPDATE 2: This has been assigned CVE-2022-36222.
Diving Into Firmware - Rooting the Router
When the device goes to update itself, it very nicely logs the download URL for the firmware.
Sifting through my own device's logs I managed to download some firmware only to find that it's encrypted.

Luckily for us some nice person on the internet has posted a download URL for an older firmware version that isn't encrypted.
https://whrl.pl/RgaV4d
You'll probably need to be on the Optus network somewhere to reach this:
http://macs.optusnet.com.au/firmware/Nokia/5GGW_D010003B37T0101E0052_ota.tar.gz
Cracking open this older firmware file we see a couple of files. The highlighted one being relevant for the Router side with the zip file being relevant for the Android side.

Trying to unpack this file we immediately run into a hurdle, it looks like a UBI image but fails to unpack with ubidump.
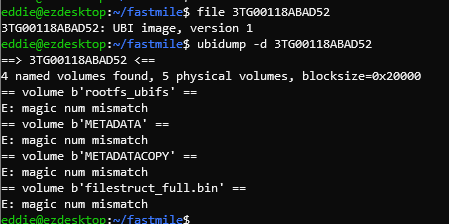
Some Googling brings us to this issue which seems to be what we ran into. Several Squashfs volumes inside a UBI image.
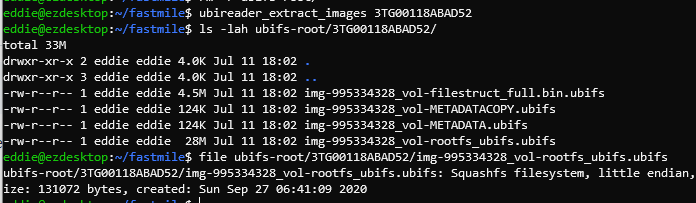
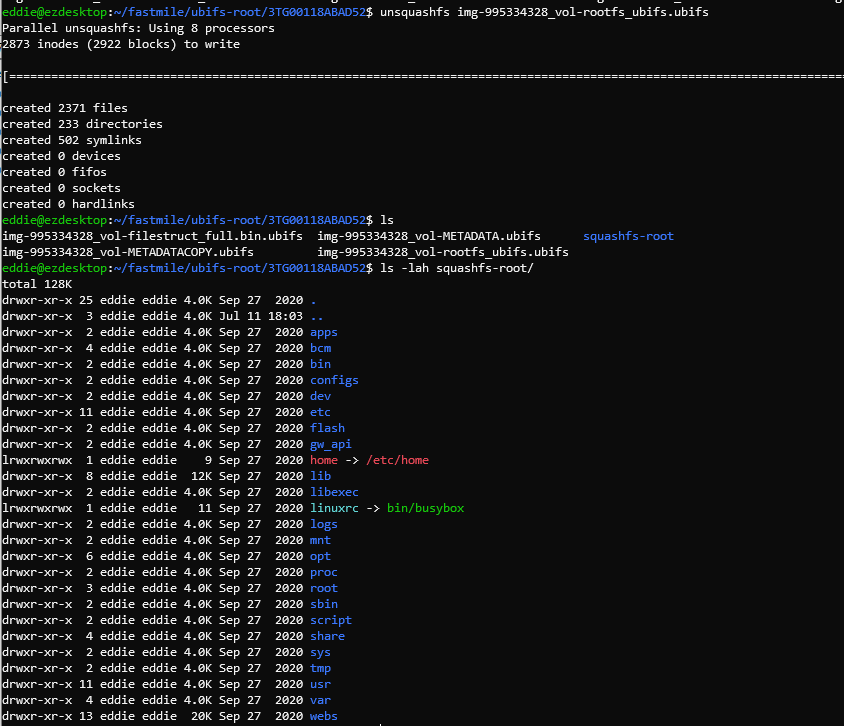
Unpacking the squashfs volume shows us the root filesystem.
Configuration Manager
After running strings on the config manager binary and sifting through the results, a single line caught my eye.
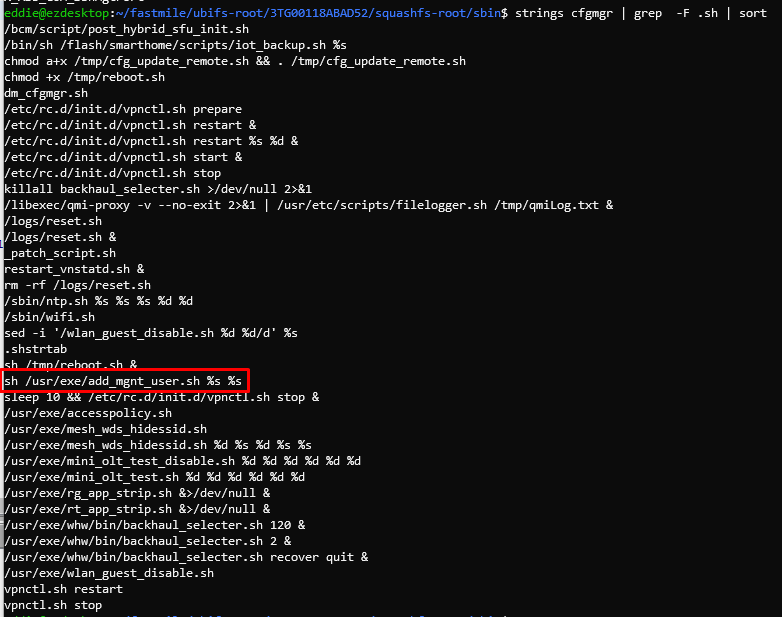
Adding management users sounds like something I want to do.
In the middle of this script there's also a very interesting if statement (full script for those interested).
if [ -e /usr/sbin/vtysh -a "$user_name" != "ONTUSER" -a "$OPID" != "0000" -a "OPID" != "9999" ]; then
   adduser -D -h ${home_dir}/${user_name} -G wheel ${user_name} -s /usr/sbin/vtysh
else
   adduser -D -h ${home_dir}/${user_name} -G wheel ${user_name}
fi
At this point, we know:
- We have access to change the config of the router including managing users
- This script is called by the Configuration Manager at some point
- If the username == ONTUSER OR if the OperatorID == (9999 OR 1111) then users are created with the default shell instead of the jail shell
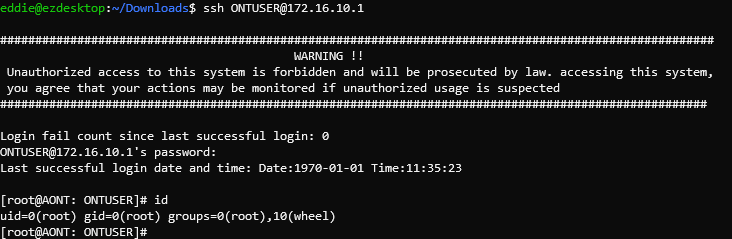
Sure enough, by changing the "TelnetSshAccount" username to "ONTUSER" and SSHing we are greeted with full root access instead of a jail shell.


Other
Firmware Dumping
Broadcom Firmware Dumping via CFE Bootloader
When connected via serial, the device conveniently prints out the partition table which will be useful for us.
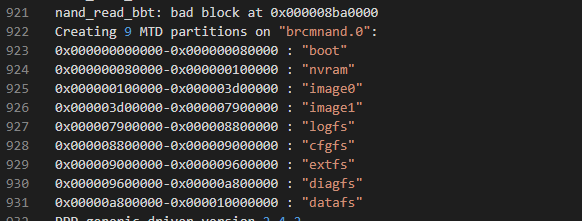
For demonstration purposes we'll be dumping the cfgfs partition which contains things like the configuration files on the Fastmile.
If we want cfgfs, this means we want to extract all data between addresses: 0x000008800000-0x000009000000
If you reboot the device again while spamming any key you can interrupt the boot process to get into the CFE bootloader (this only applies to devices which have unlocked CFE bootloaders).
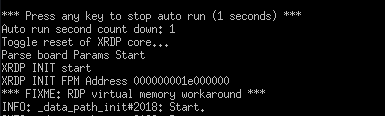
This exposes several commands. For the purposes of dumping partitions off the device dn is the one we're interested in.
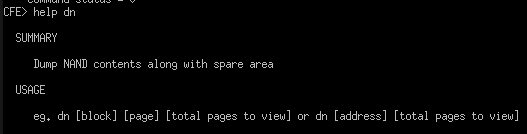
Figuring out Block Numbers/Pages
NAND flash is laid out in Dies -> Planes -> Blocks -> Pages, ref. Without diving too deep into the topic, what you practically need to know is that:
- The
dncommand expects you to tell it what block/memory address to start dumping from along with how many subsequent pages to look at. - The Fastmile has 2048 blocks with 64 pages a block.
- I figured out the above through trial and error:
- Attemping to dump a large block number results in an error "Attempt to read block number (5000) beyond the nand max blk(2047), hence there are 2048 blocks.
- Attemping to dump block 0 page 64 (index of 0) using
dnwill actually dump block 1 page 0, meaning each block has 64 pages.
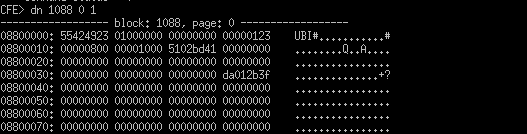
Now we need to know how many pages to view starting from 0x8800000.
- By running
dn 0x8800000 1(dump 1 page from memory address 0x8800000) the tool tells us that 0x8800000 is block 1088. - By running
dn 0x9000000 1(dump 1 page from memory address 0x9000000) the tool tells us that 0x9000000 is block 1152. - Subtracting block 1152-1088 means we want to dump 64 blocks.
- With 64 pages per block we are looking at dumping a total of 4096 pages.
Therefore to dump the cfgfs partition the final command we want is: dn 1088 0 4096
Logging and Converting Output
The dn command prints output in a hexdump like format. We want to capture this, remove things from the log we don't need and then convert it to a binary file for final file extraction.
Capturing the output is pretty simple. I used Putty to do this for me.
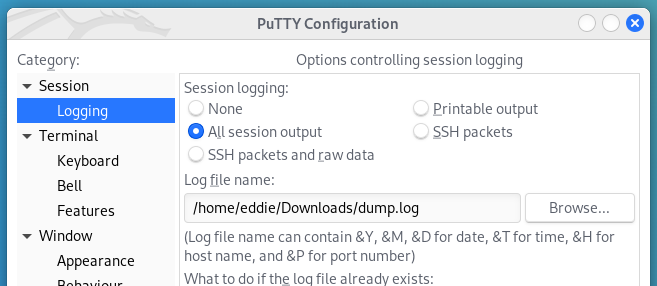
With logging setup, run the dn command from above to dump the pages and wait.
Once the capture is complete we need to filter the log for information we don't care about. The goal is to remove lines from the log that we don't care about e.g.:
- White space lines.
- Other descriptive lines (e.g. ------ block blah).
- Spare area data for each page.
- Any NAND read errors.
- In my case the entirety of block 1117 needed to be excluded.
I wrote a small script to do this for me (you'll want to adjust my exclusion of block 1117 to a more generic error message if you're going to reuse it).
The cleaned output can be obtained like so:
python3 parse.py dump.log > ~/Workspace/Fastmile/Config/output.log
We need to remove the first column and last column from our output log keeping only columns 2-5 and then convert it to a binary file. This blog here explains in detail what we're trying to do (https://nstarke.github.io/hexdump/binary/linux/2021/08/27/hexdump-to-binary.html).
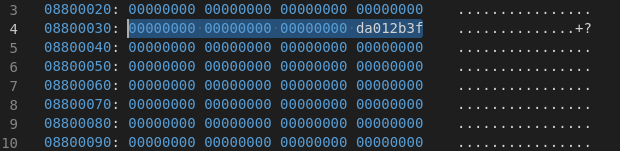
The modified oneliner for us looks like this: cut -d' ' -f2-5 output.log | xxd -r -p > output.bin
Finally, with a bit of luck, you can simply run ubidump on the binary file to extract files.
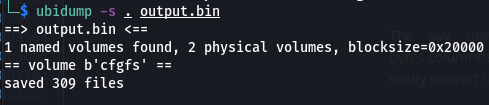
Taking a browse through we see files like the config_encryption.cfg which is the configuration file that used to be accessible through the Web UI.

Android Firmware Dumping via EDL
EDL stands for Emergency DownLoad Mode and is a special boot mode normally used by OEMs to allow recovery of bricked devices, force flashes of firmware or dumping of firmware.
The Fastmile can be put into this mode to obtain a live copy of the Android side's firmware in case the device becomes bricked or you want to analyse it.
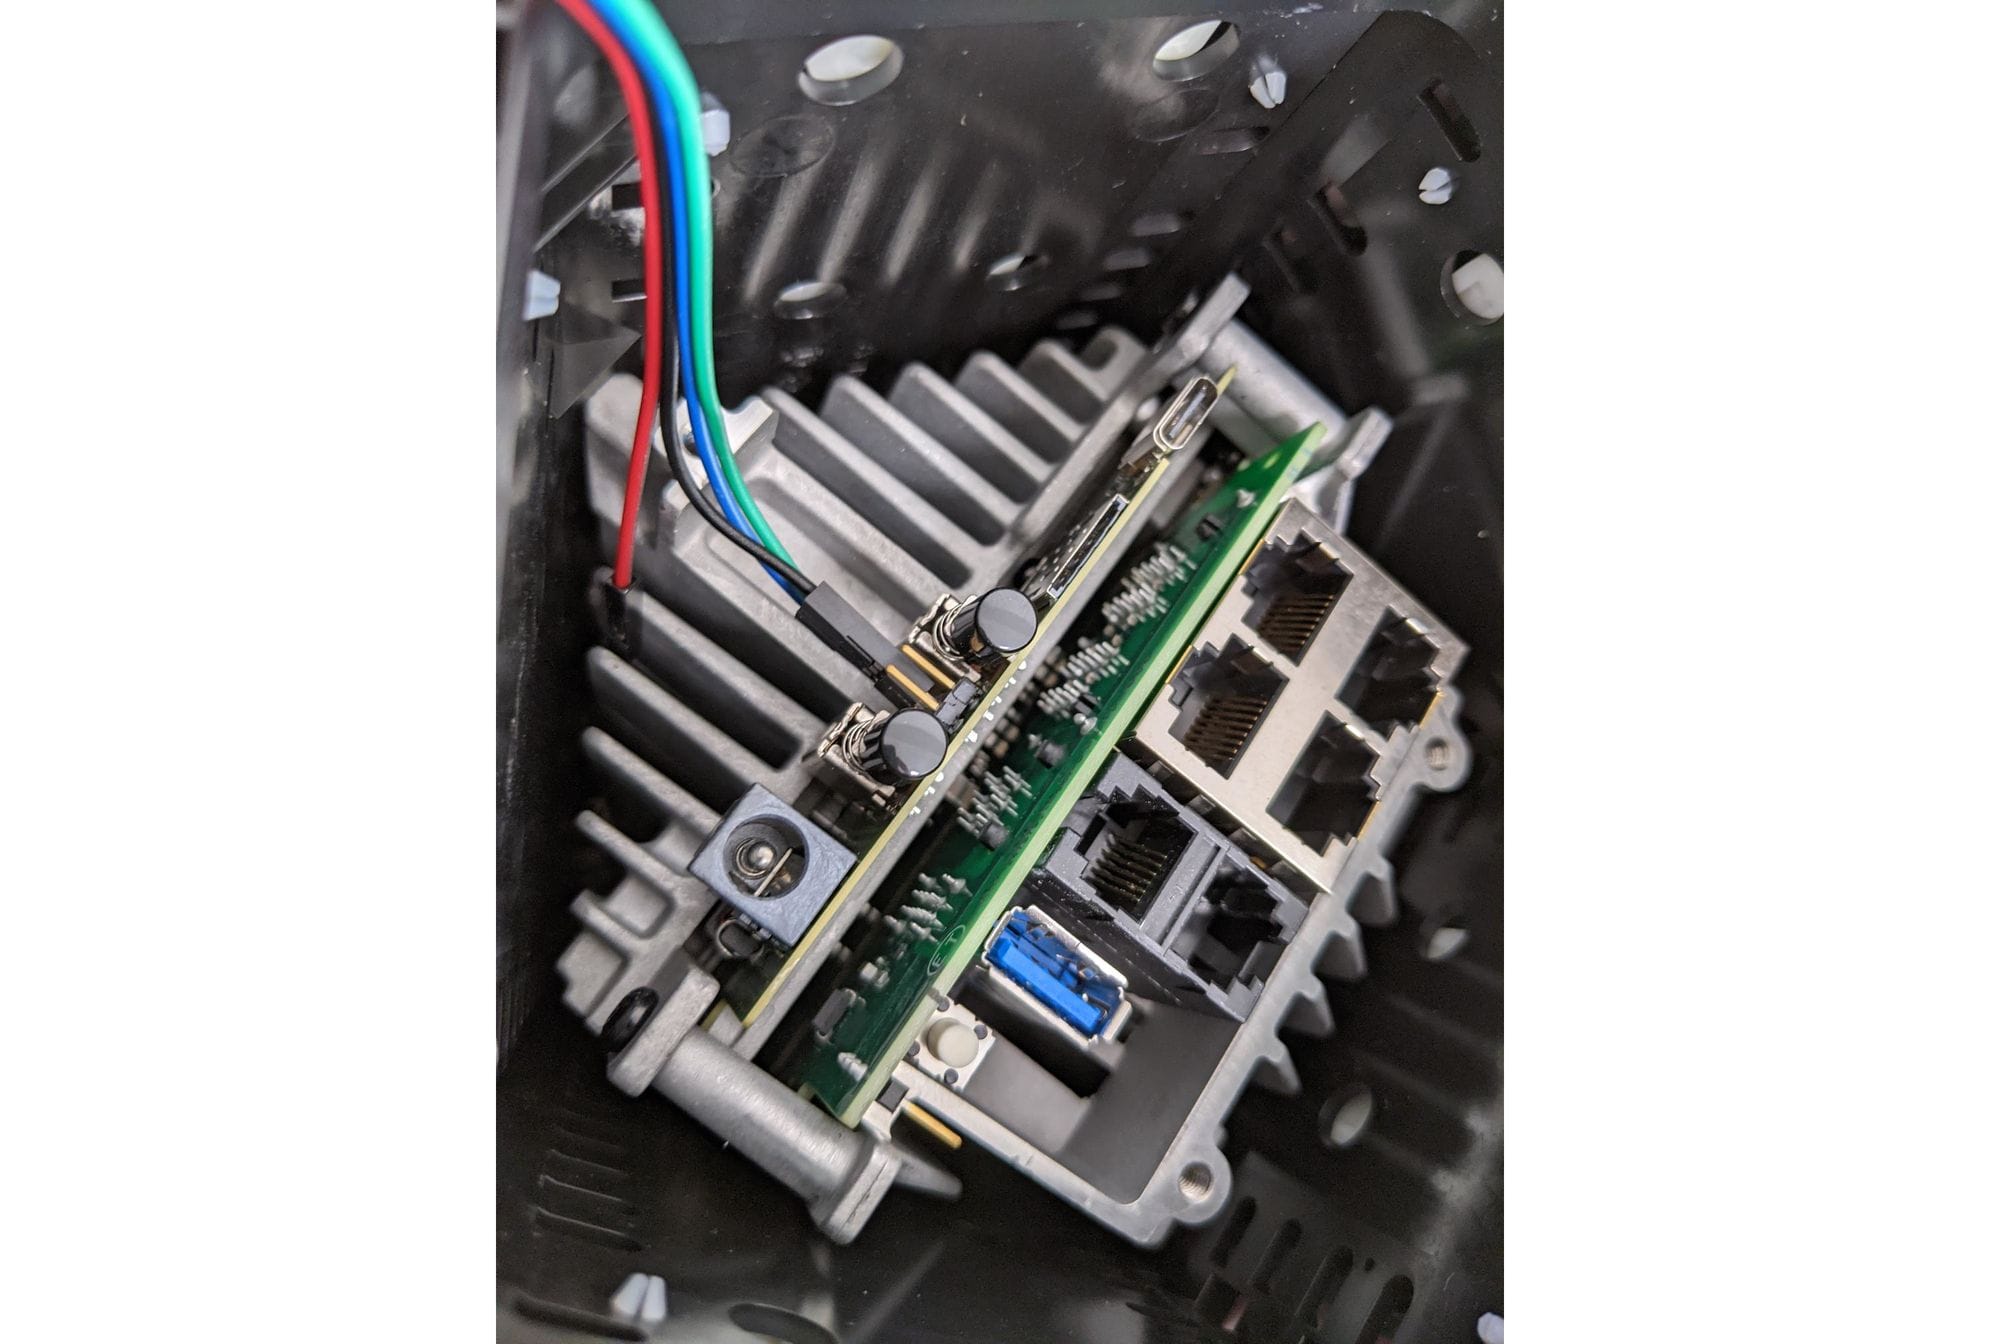
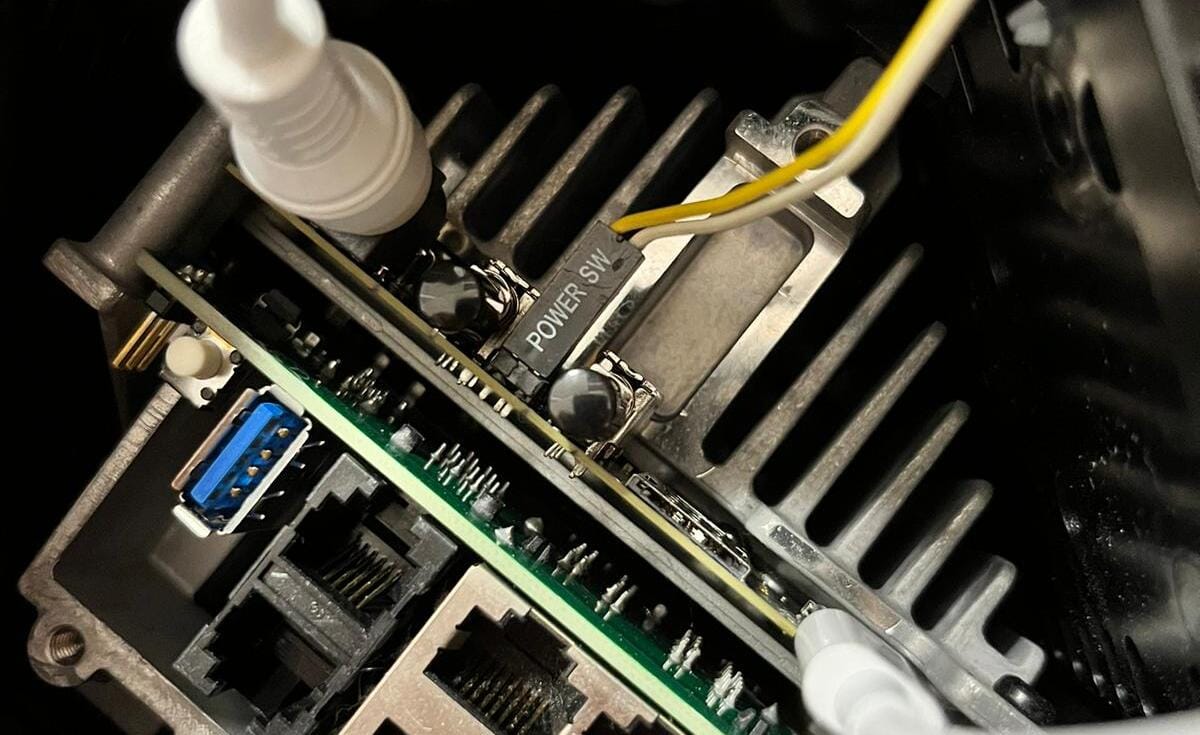
To place the Fastmile into EDL mode, two headers (next to the UART ones) need to be shorted on boot. The power switch button pictured was just used to more conveniently short those 2 pins, but you can use a screwdriver to do this as well.
When plugging in a USB-C cable you should then see a device with ID 05c6:9008 appear when you run lsusb.
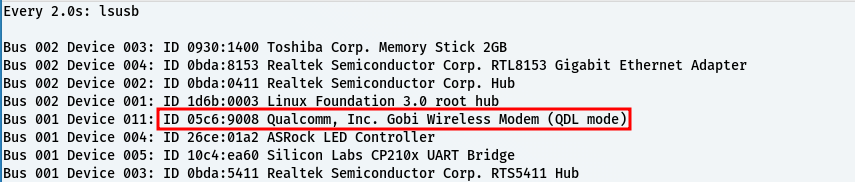
From here you can use tools like: https://github.com/bkerler/edl to dump LUNs/partitions from the device and write them back.
Running edl printgpt --memory=ufs --lun=0 lists partitions for LUN0 on the fastmile.
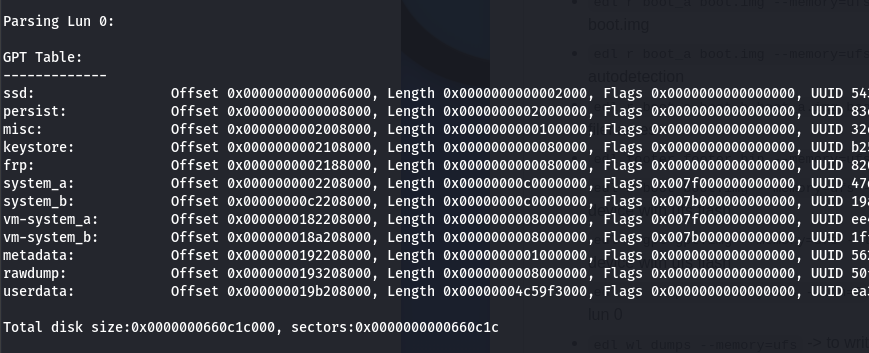
edl rf lun0.bin --memory=ufs --lun=0 can be used to dump the first LUN to file.
Other commands: https://github.com/bkerler/edl#for-ufs-flash
Teardown
Out of curiosity, I took the device apart a bit more as I hadn't seen any other write-ups detailing this.
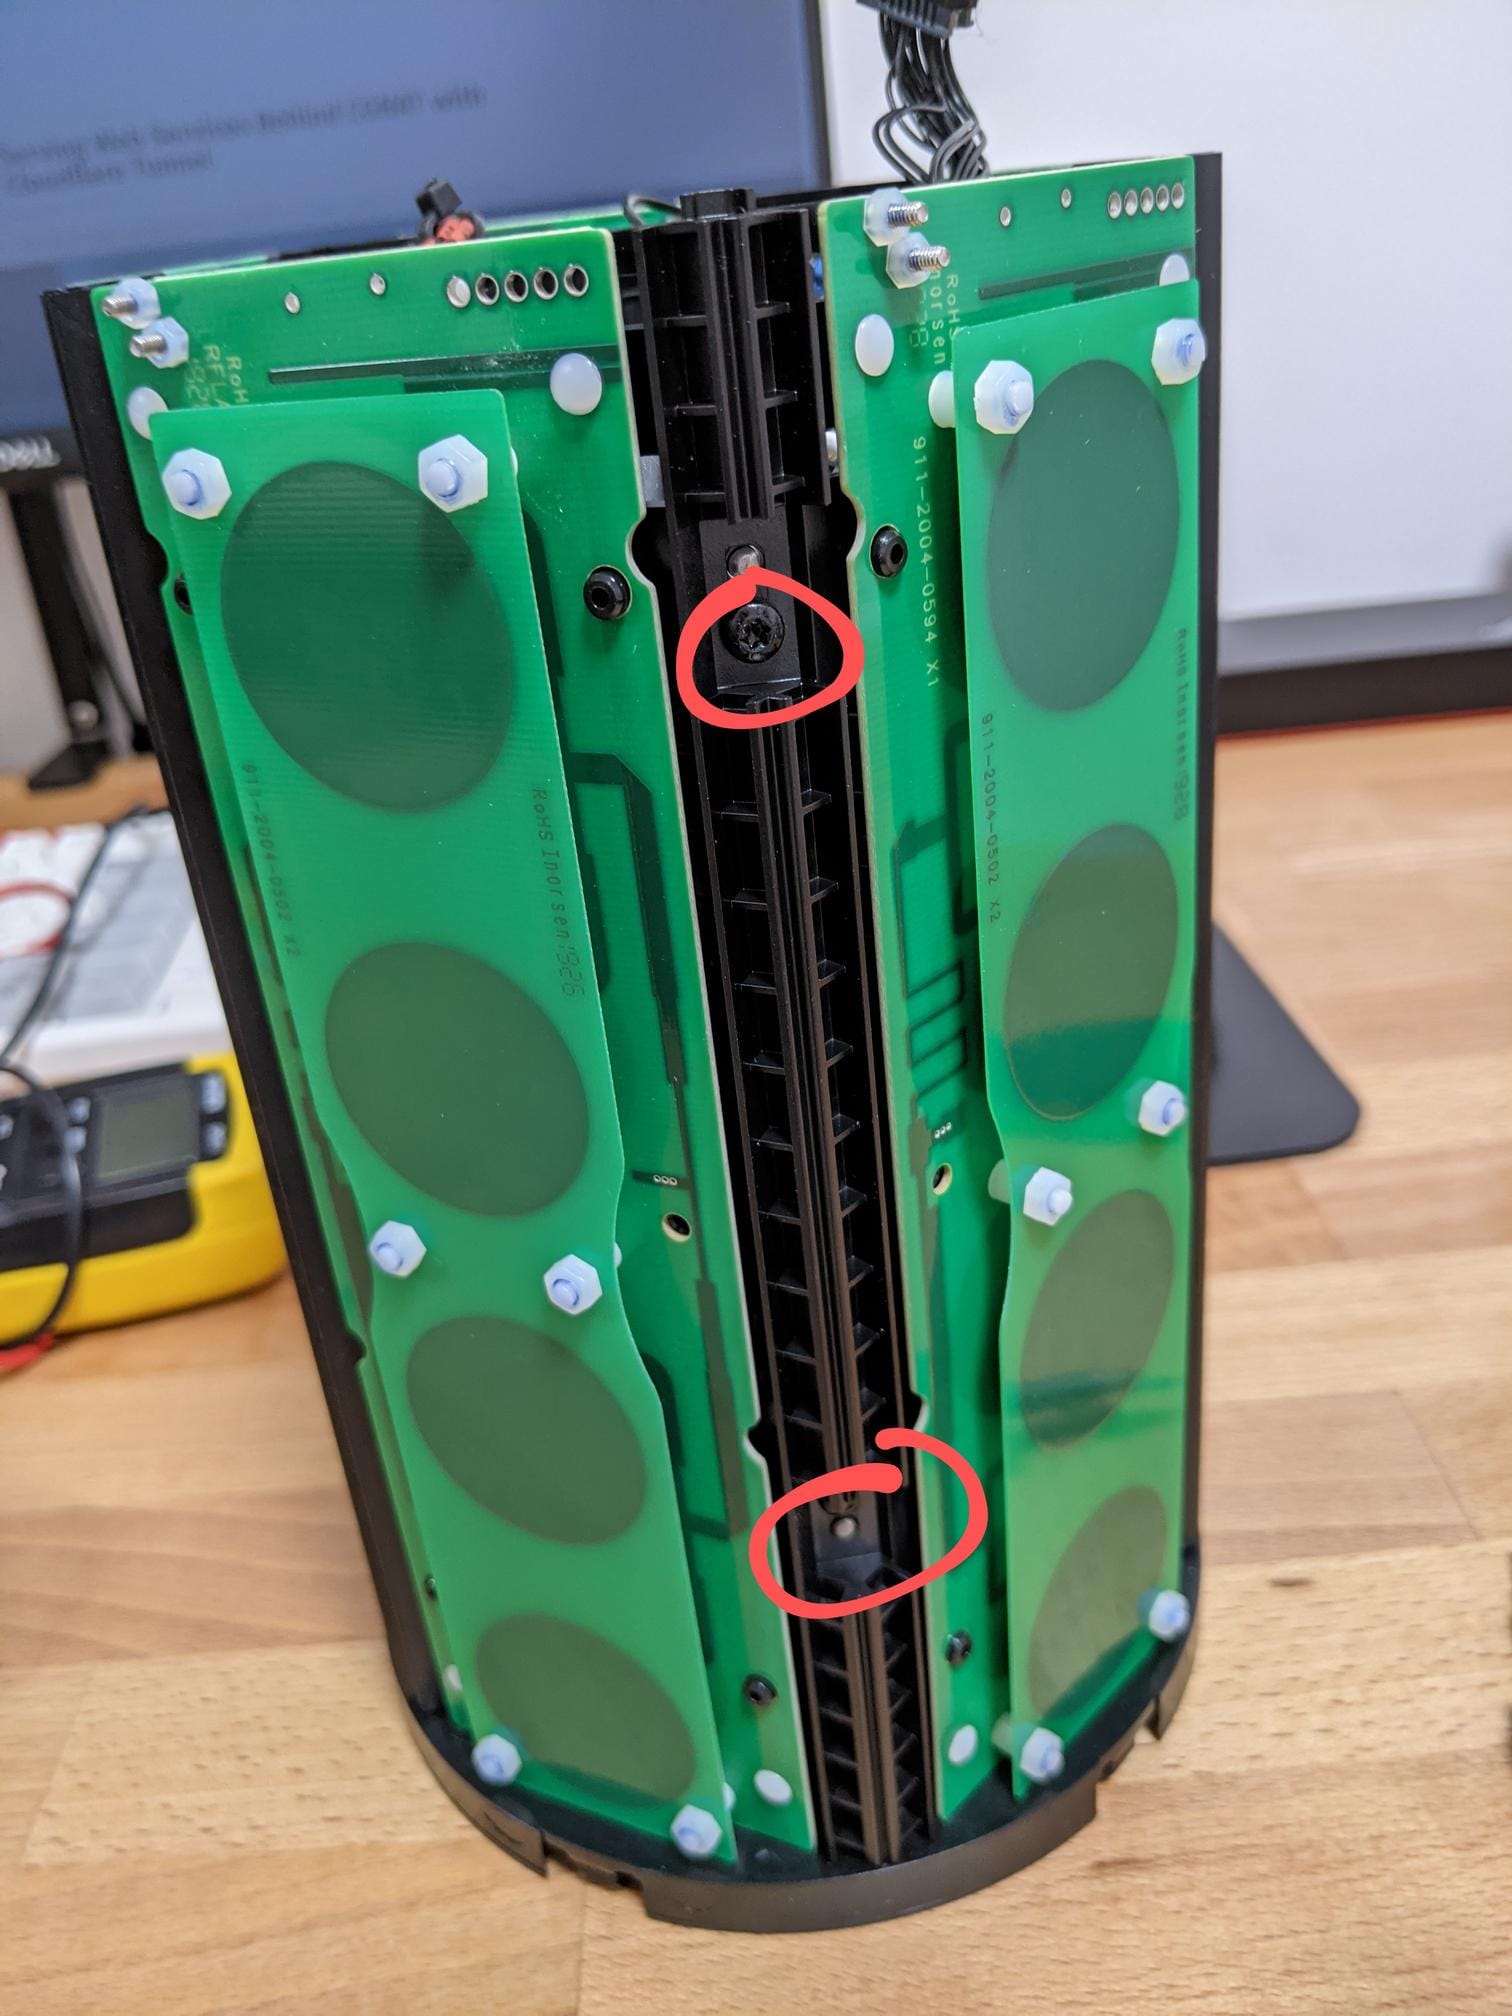
Tracing back to the step where we'd removed the bottom of the device, the next step of disassembly is to bend back the clips around the perimeter circled in red. I've also circled the UART pins in yellow for clarity.
Now you can flip the device and lift up the white shell to reveal the antennas.
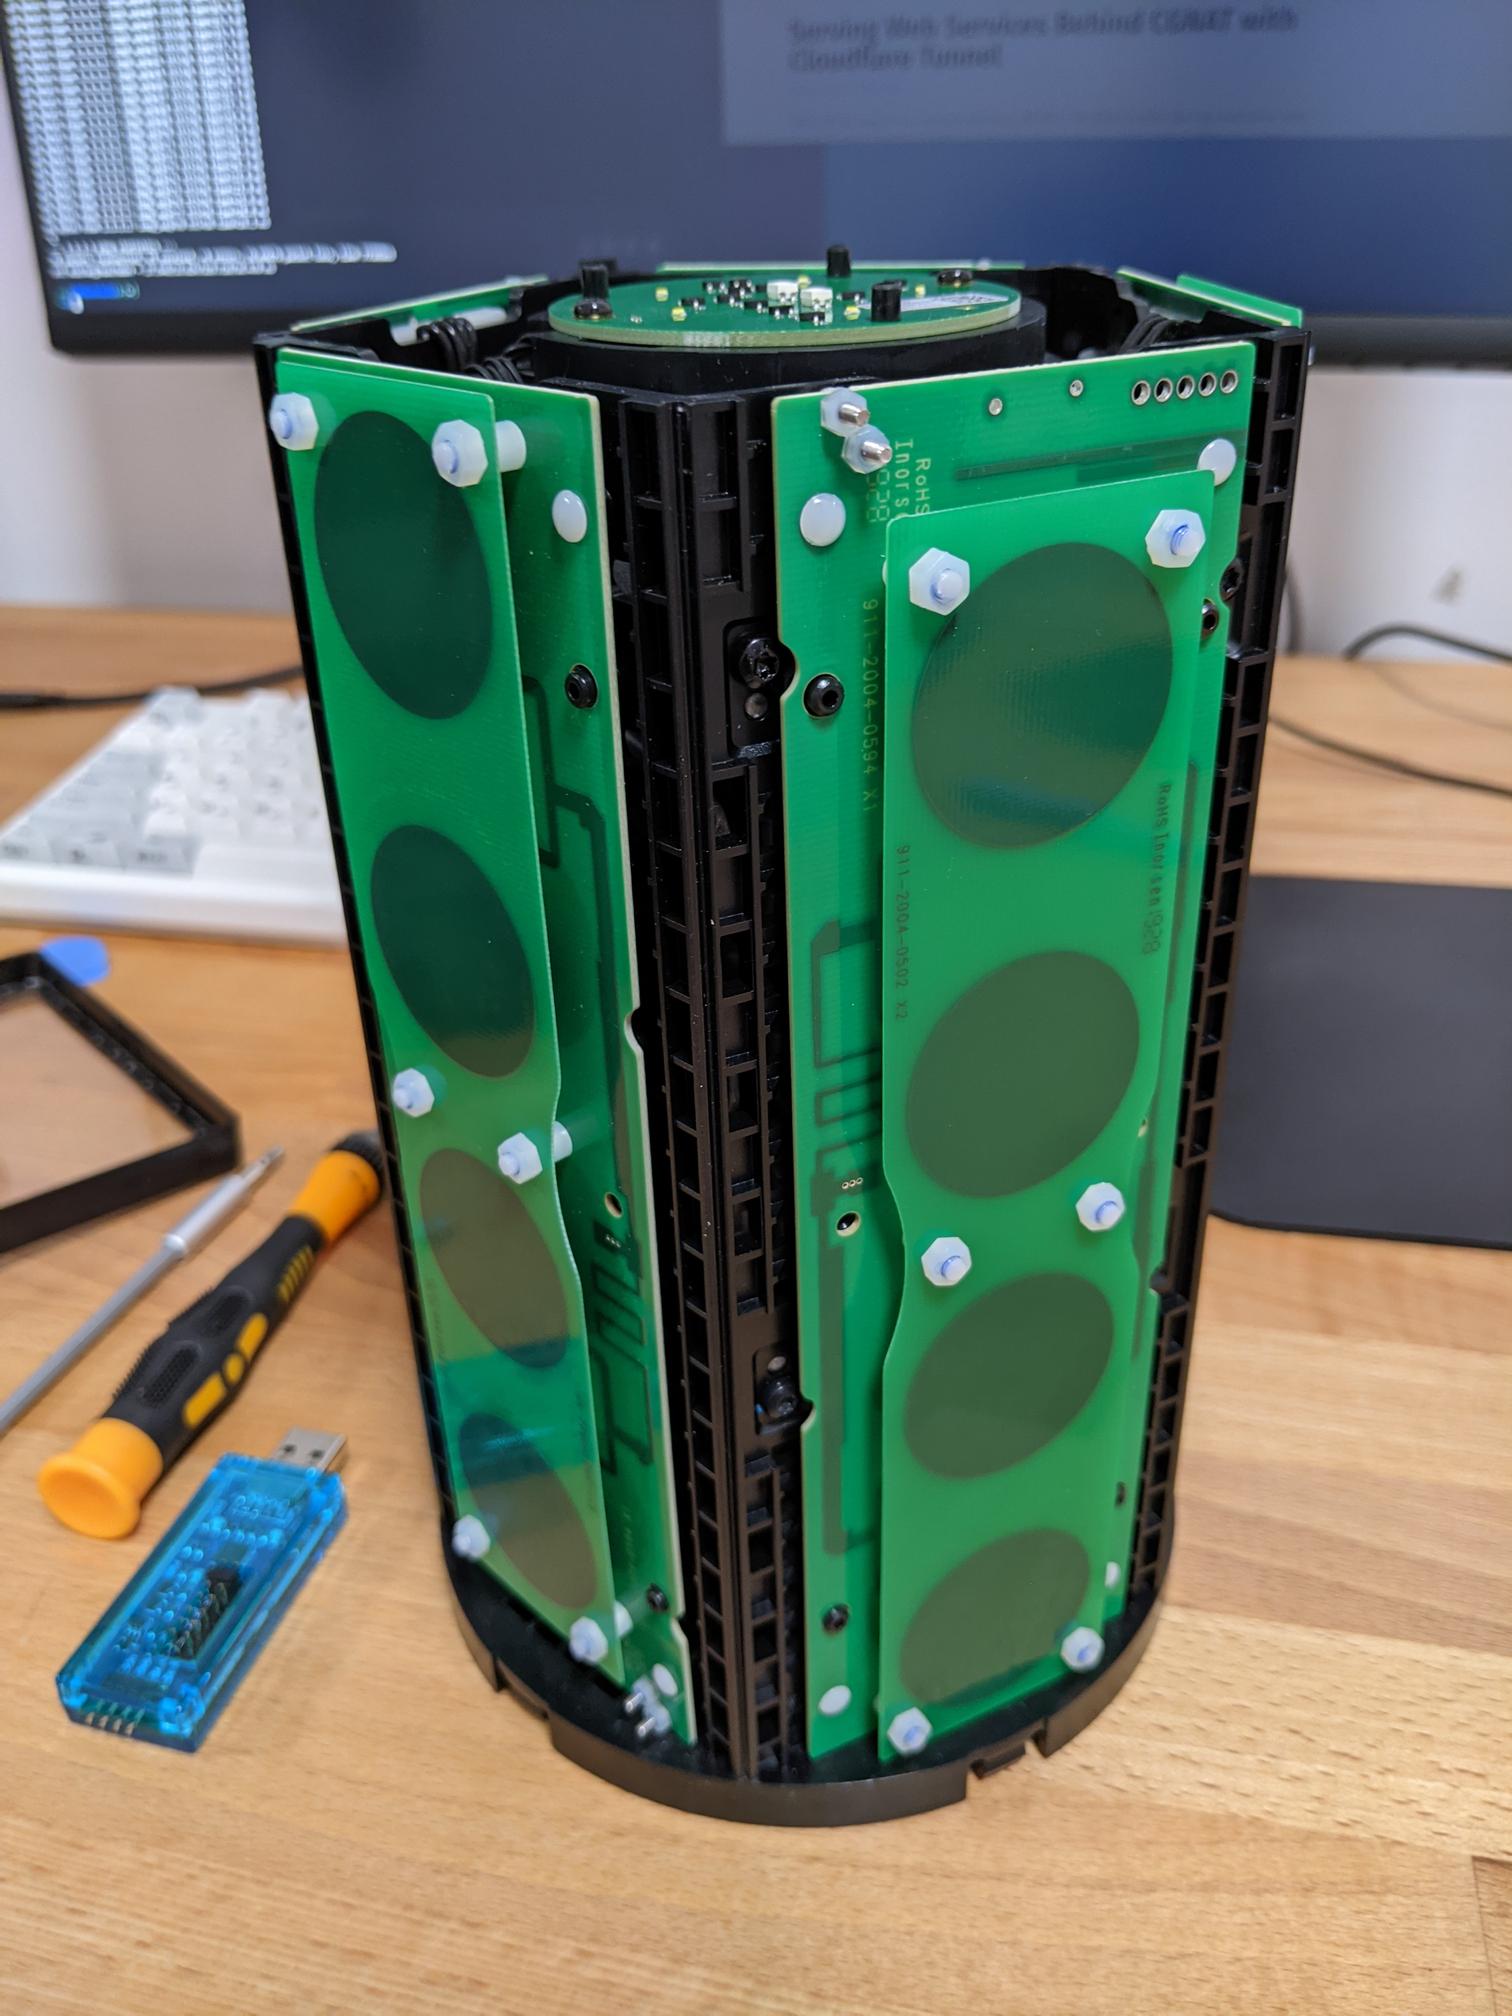
Every bolt from here on is a Torx T8H. Looking at the top there are 5 bolts to undo which loosen the LED indicator board.
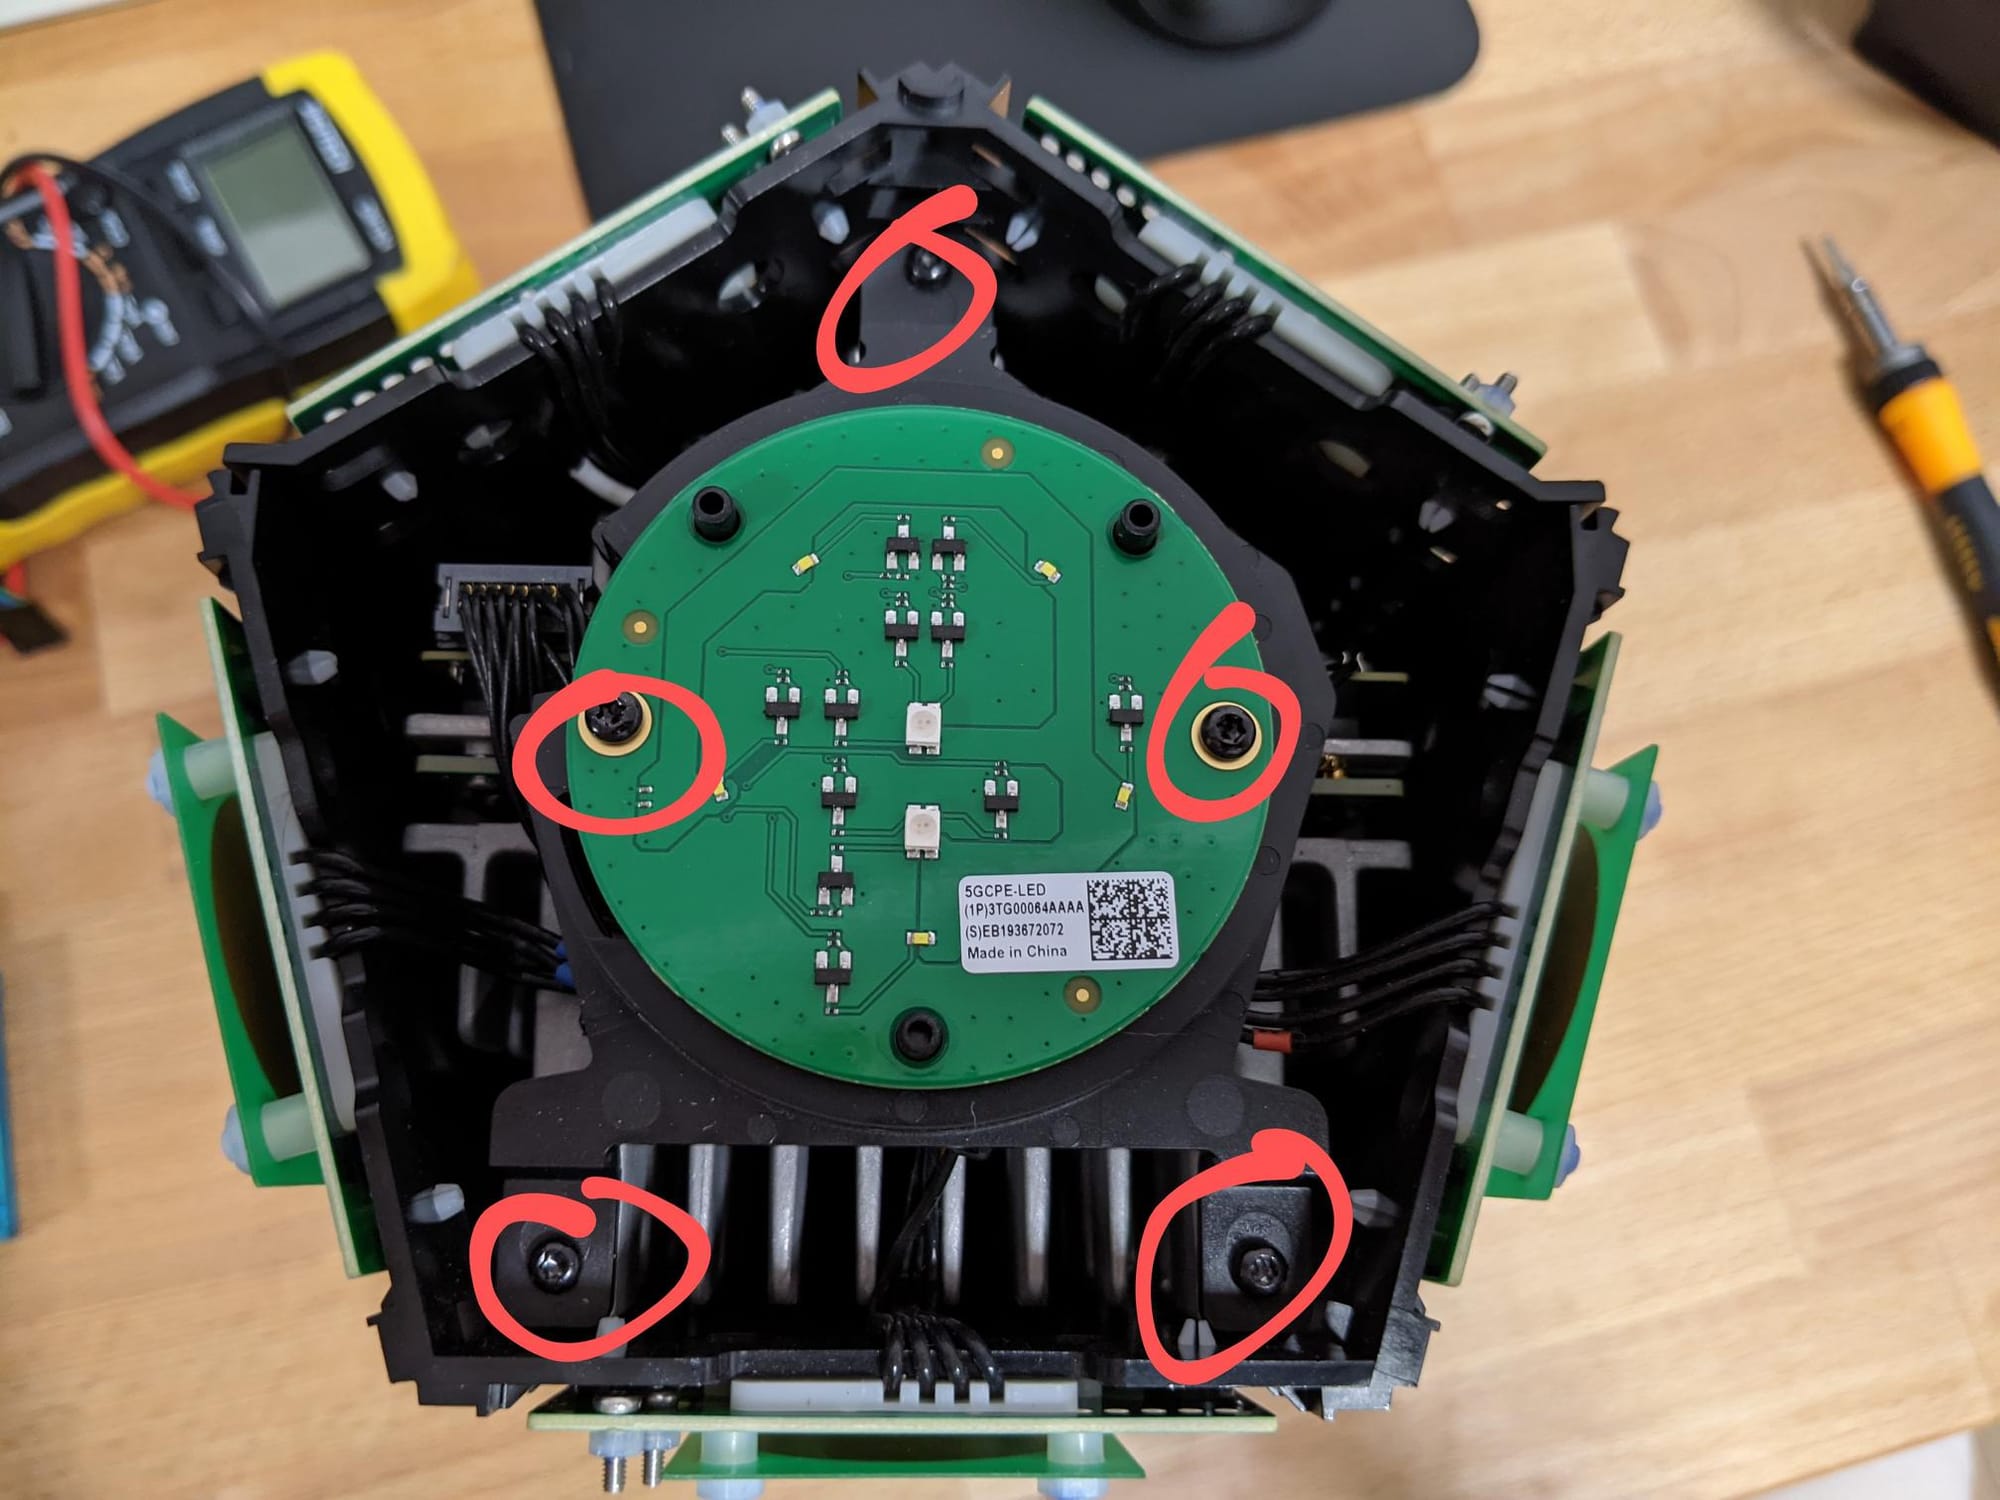
With the top LED indicator board off we can see where all the antenna's terminate. If you wanted to attach an external antenna, this is where you'd do it.
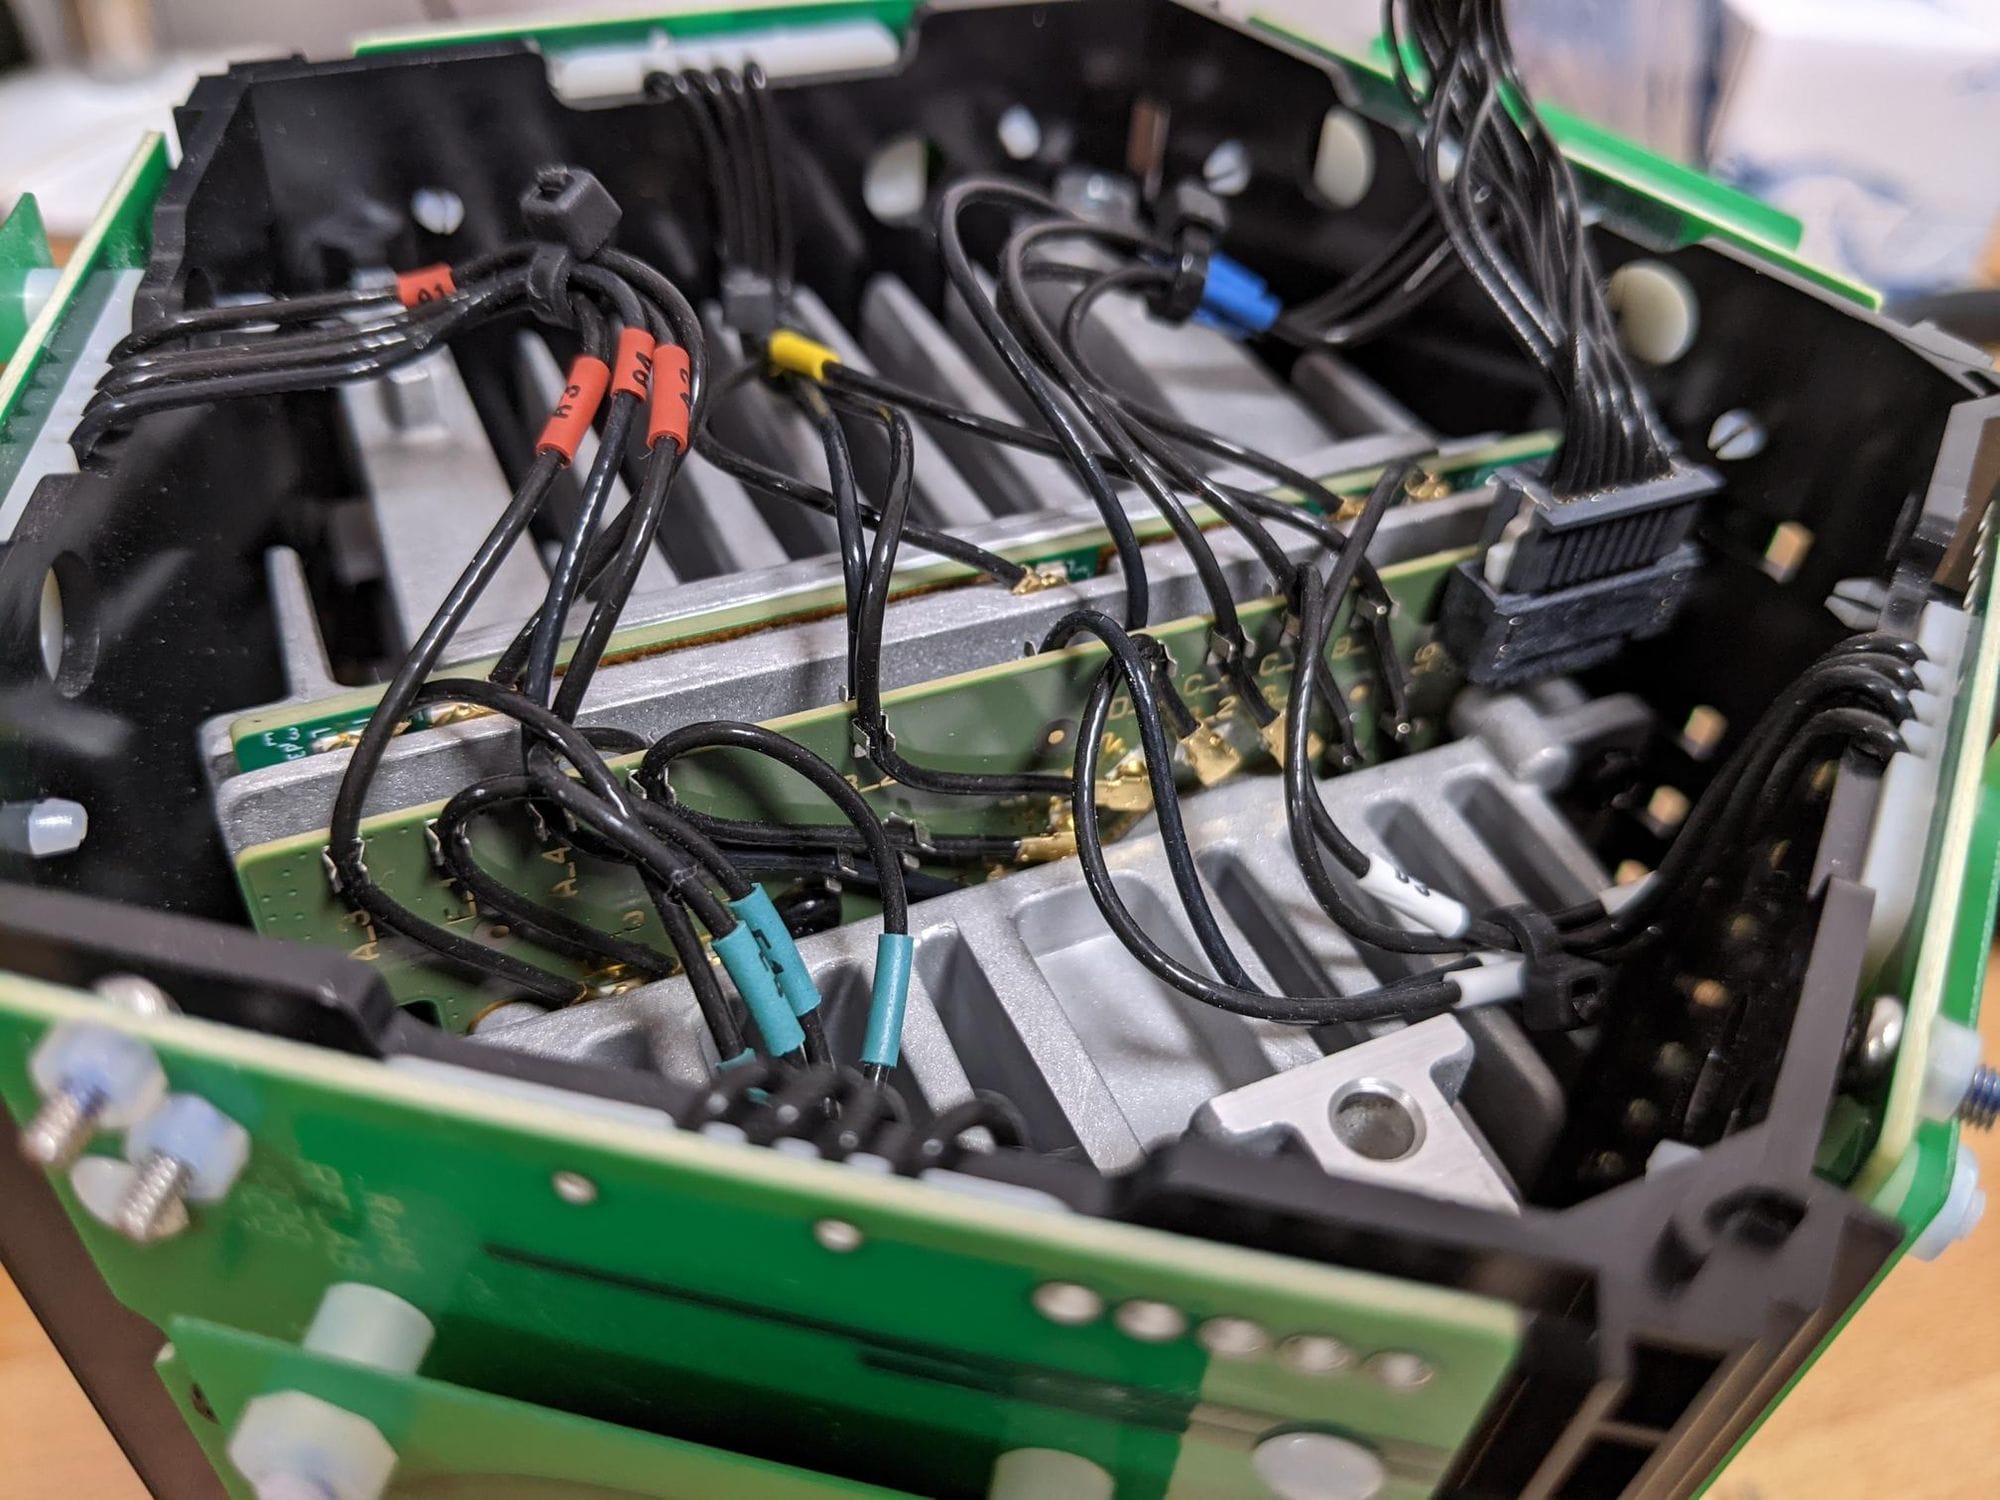
Unfortunately, accessibility to the connectors is very limited as some snake under the heatsink. I did try removing the heatsink later but it was pretty solidly bound to the PCB so I'm not sure if it's held together with a thermal epoxy or if I missed some bolts.
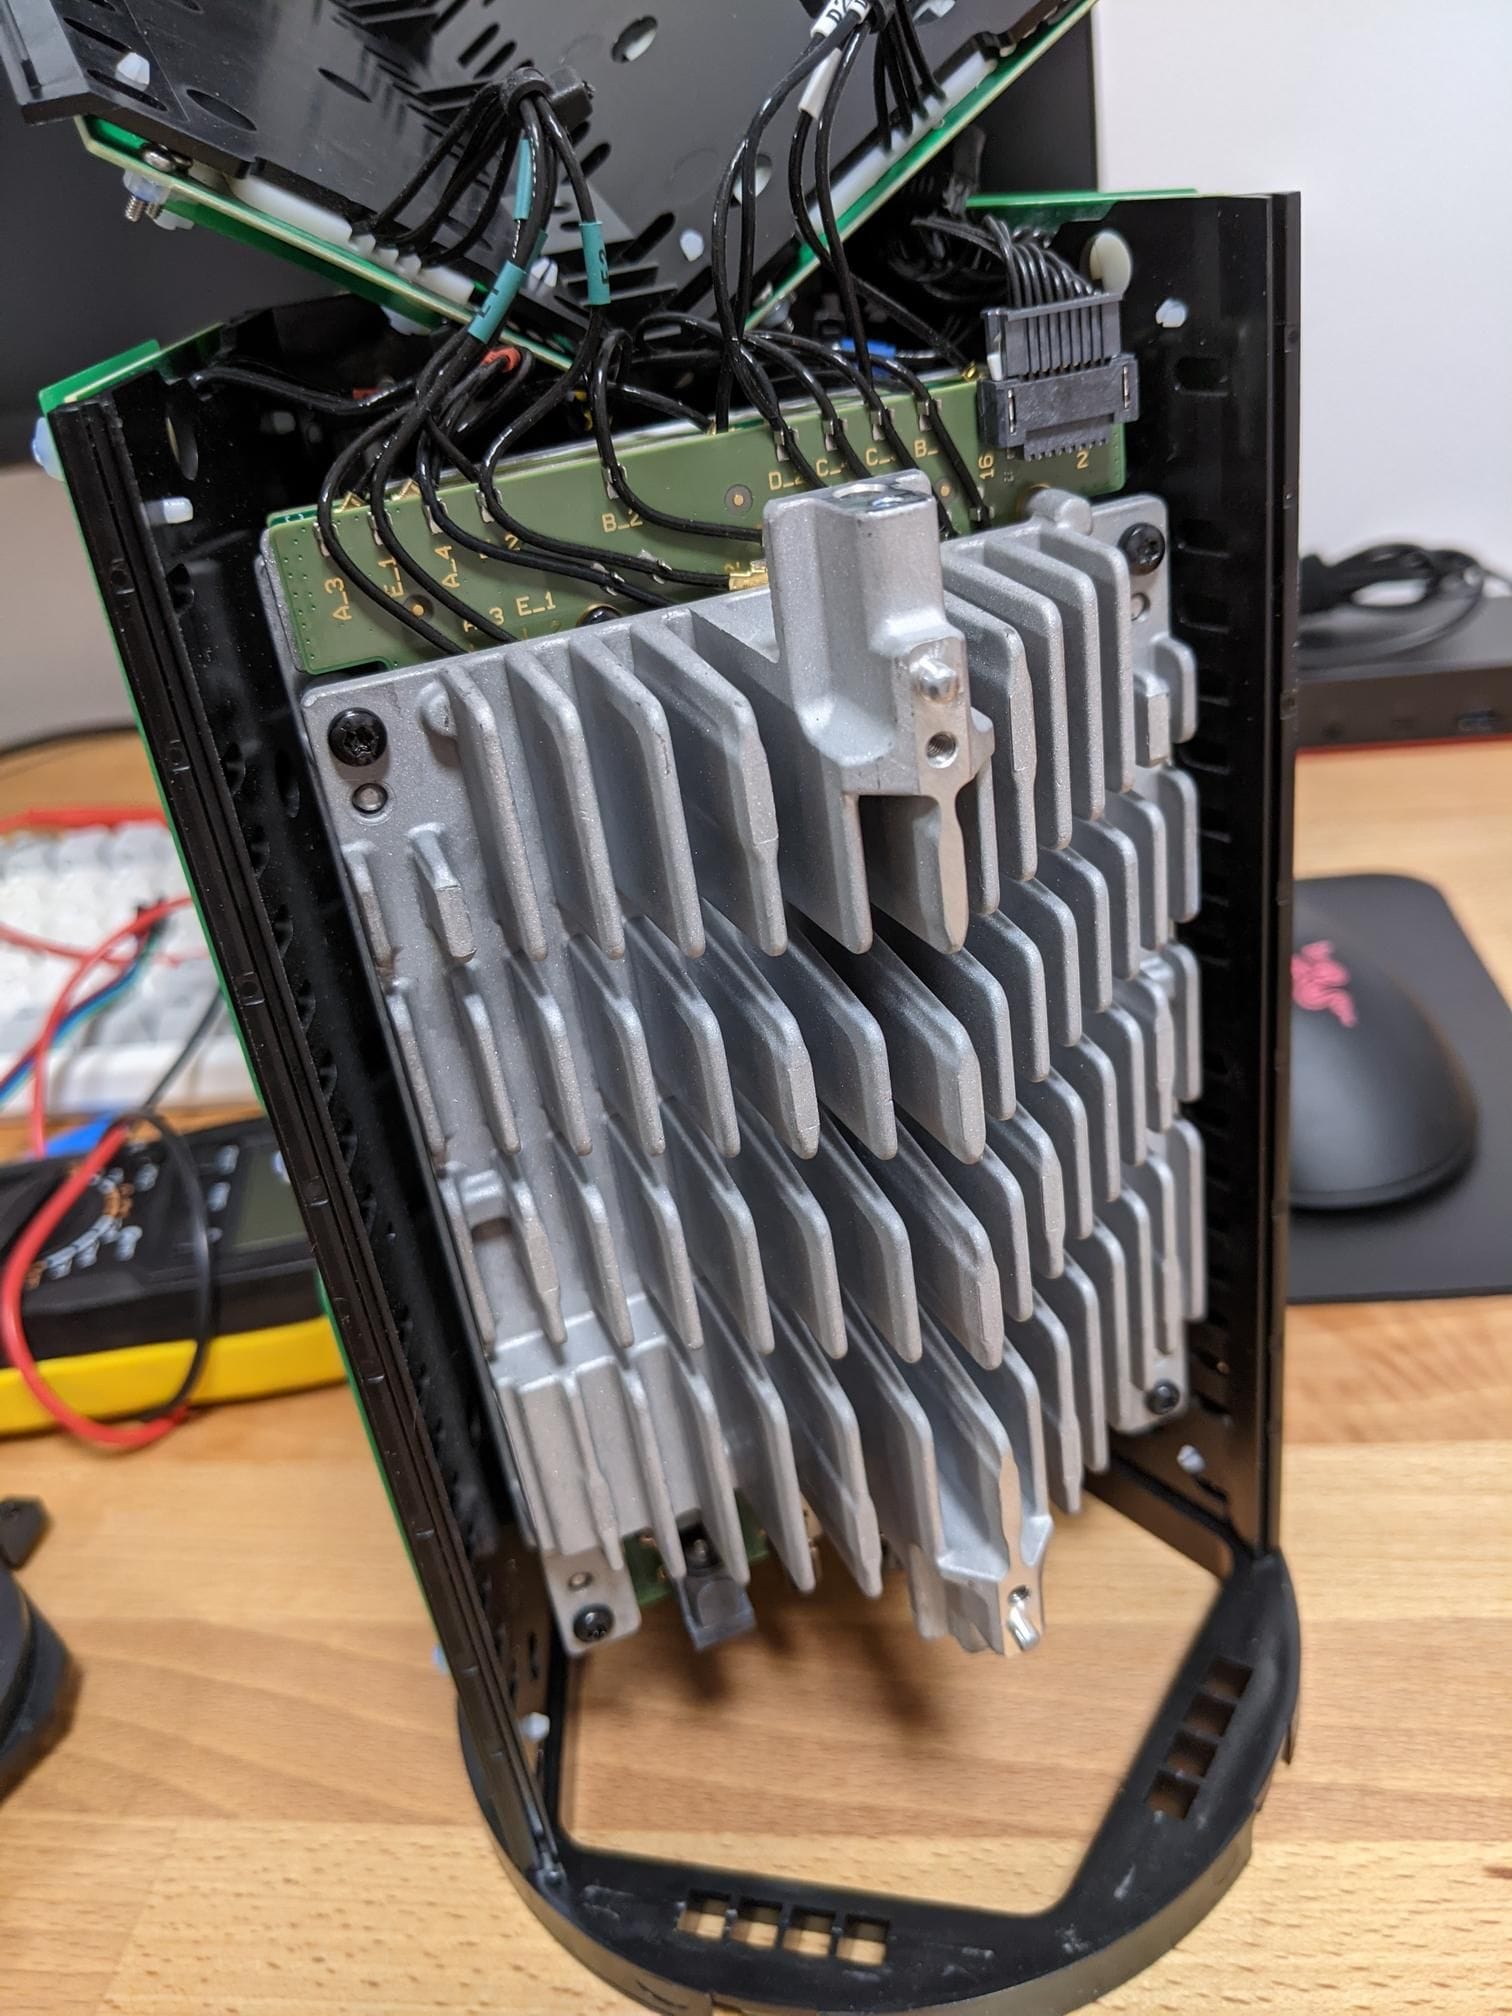
Next up, looking at the side of the device with the smaller heatsink (Android side), there are two more bolts on the diagonal face to loosen.
This allows you to lift up 2/5 sides of the antenna assembly revealing the Android device.
Removing the 4 bolts that hold the Android side in allows you to lift and fold the device over like we've done with the antenna panels.
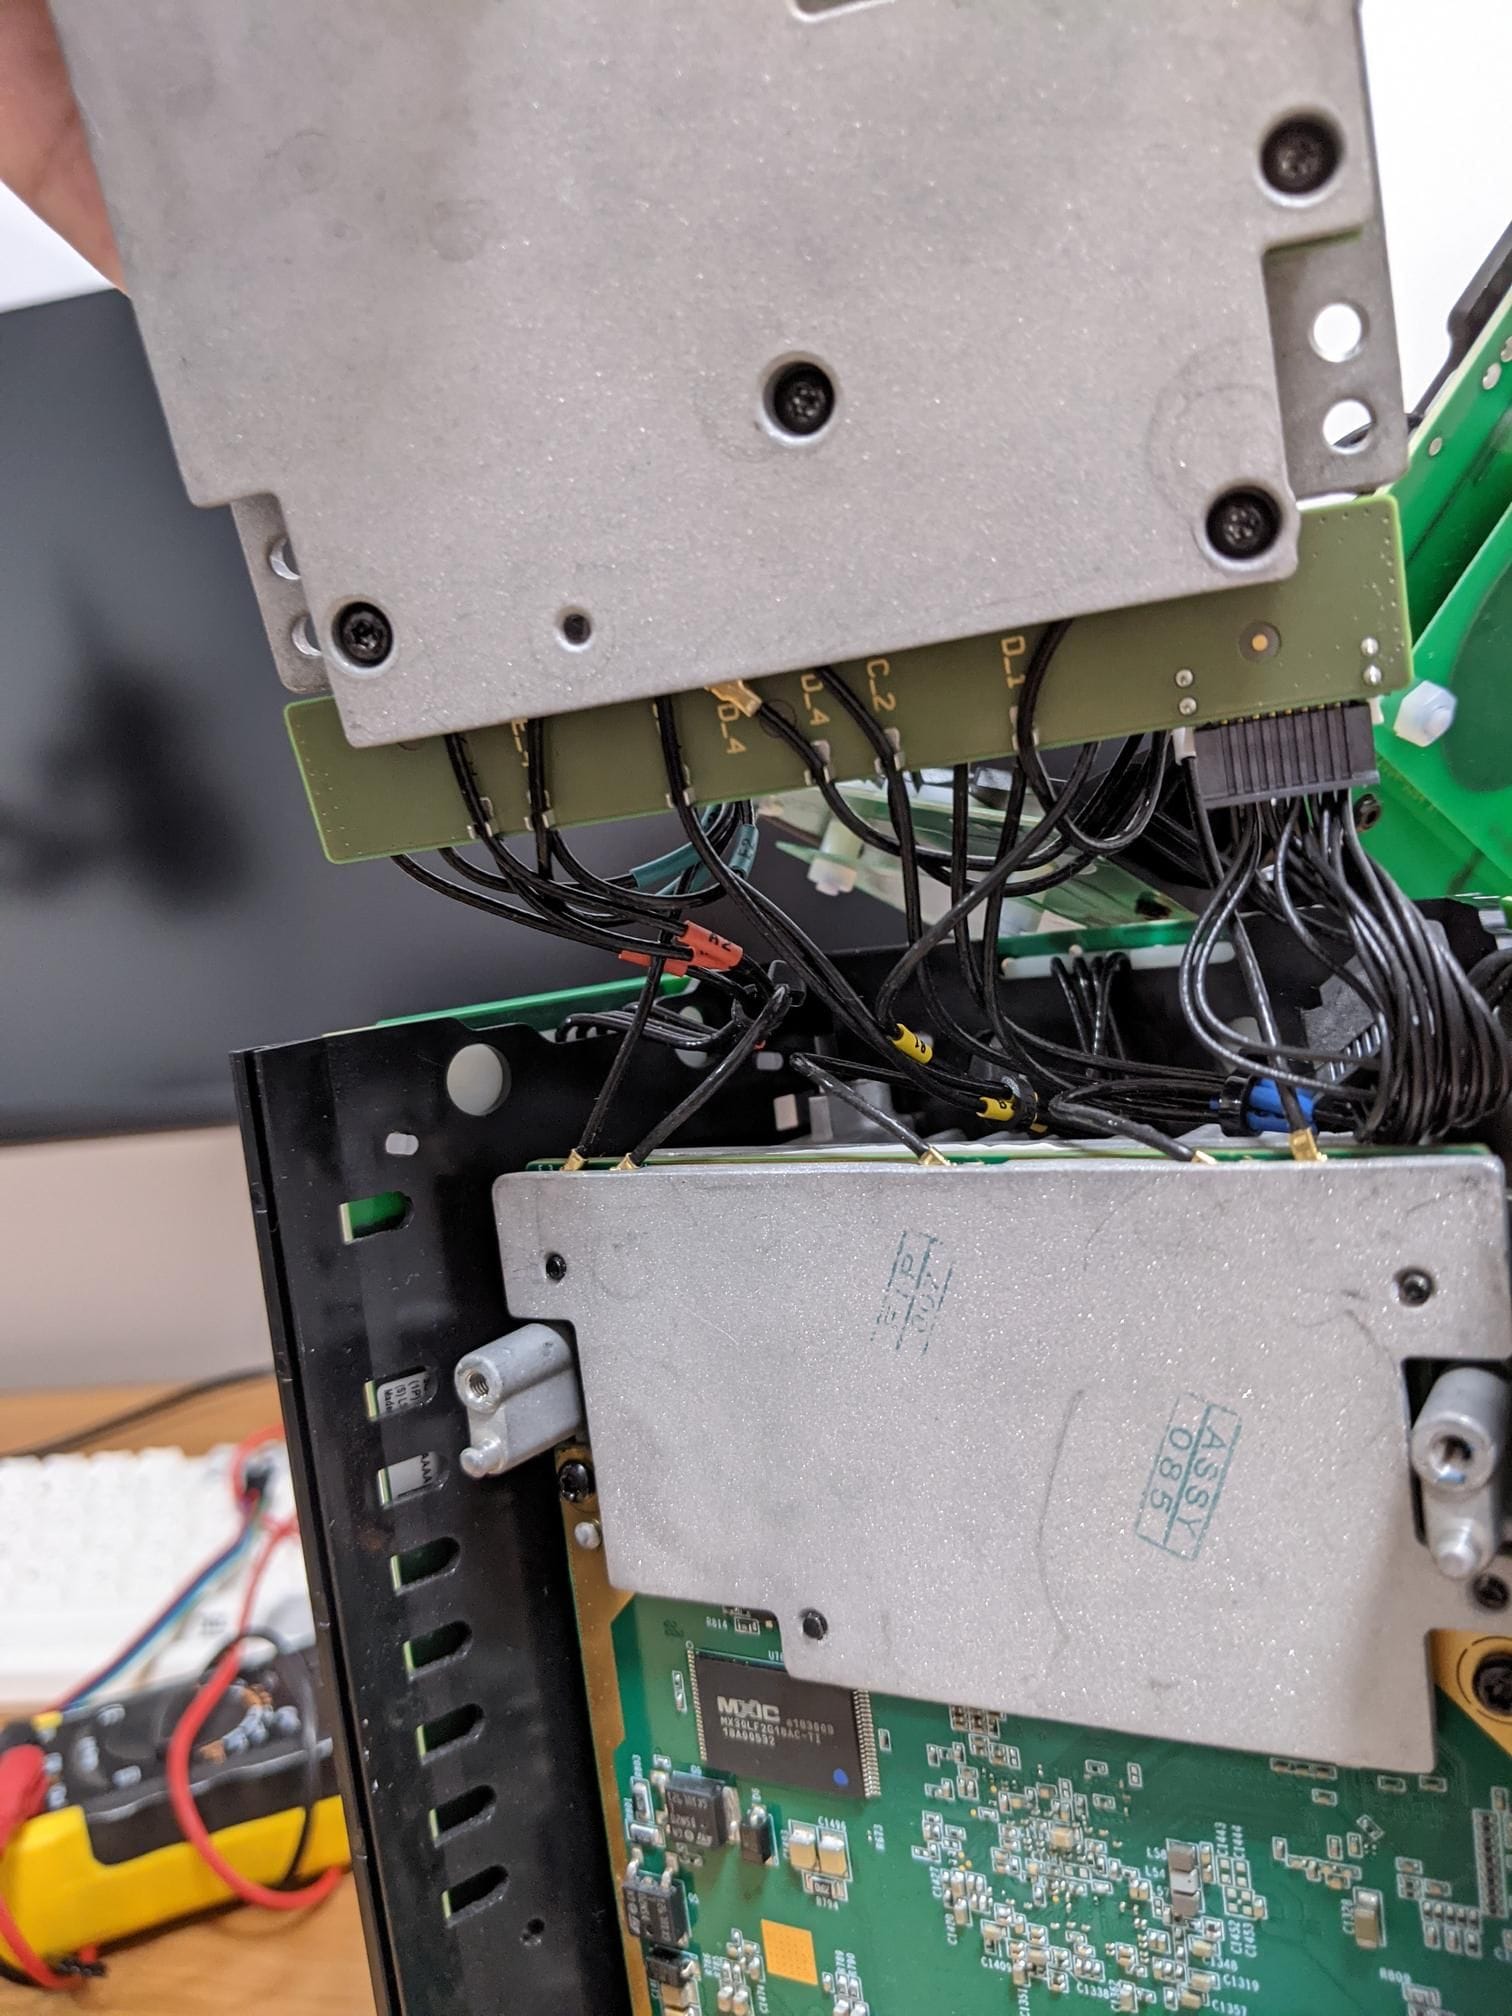
This also reveals the backside of the Alcatel-Lucent router and the only electrical interconnect between the two devices in the bottom right.
I didn't go any further as the router side is mostly covered up by it's heatsink and if it's anything like the Android side then it was likely to also be difficult to remove.
Weird Stuff
Backdoor?
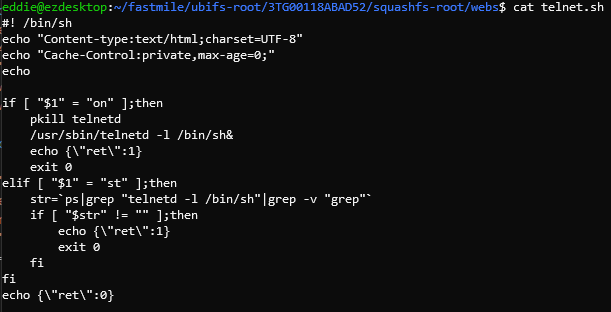
There's a telnet script in the web directory which seems to spin up a telnet server that gives shell access without authentication.
Couldn't find anywhere this gets called though. ./telnet.sh on will turn the backdoor on and ./telnet.sh st checks the status of the backdoor
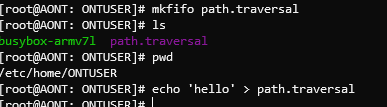
Pipe Path Traversal
UPDATE: This has been assigned CVE-2022-36221.
The CGI script used to read the output of diagnostic pings is affected by a path traversal vulnerability.
Opening the command_web_app.cgi script up we see that it passes user input straight to the cat.sh script.
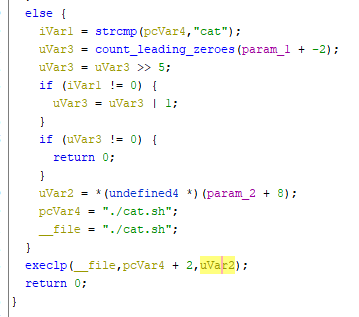
This script performs a check to see if the file is a pipe but otherwise just returns the contents.
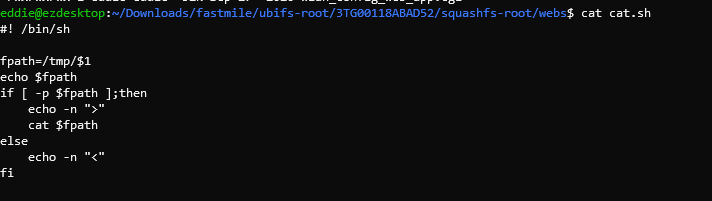
The result? We have path traversal!
The usefulness of this is dependent on the existence of pipes on the router that contain sensitive information. Also the endpoint is only available as an authenticated user (albeit full admin is not required).
The techniques explored in this post reflect the same adversarial mindset we apply during our client assessments. Our penetration testing services simulate real-world attack scenarios to evaluate the effectiveness of your security controls, uncover misconfigurations, and identify exploitable vulnerabilities before threat actors do.