
Guide to Bypassing Hotel Wi-Fi Captive Portals (With Permission)
Have you ever been curious about how easy it is to bypass that pesky captive portal? This article guides you through 3 different methods.

The classic workarounds like tunnelling SSH or VPNs over non-standard TCP ports are now widely blocked by most modern captive portal implementations. You've also probably already tried this so I'll skip over this one.
In this article, we're covering three techniques: MAC spoofing (a classic that still works) plus DNS and ICMP tunneling (both need a bit of prep).
MAC Address Spoofing/Rotation
This is an easy one that still works and doesn't require any preparation.
Rotating your own MAC Address
Hotel and airport portals often hand out 15–30 minutes of free internet before hitting you with a paywall.
If you've ever wondered how these solutions remember that you've used up your time, most implementations enforce this by simply tracking your device's MAC address.
Fortunately for us, a MAC address is trivially easy to change.
In Windows, launch Device Manager and find your Wireless Adapter under "Network Adapters".
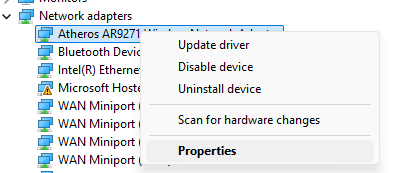
To change the MAC address most wireless adapters will have an advanced property called "Network Address" or something similar.
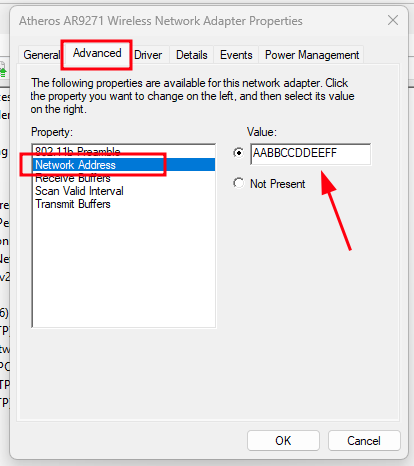
Change this field from Not Present to any arbitrary 12 digit Hex address, then connect to the network as normal and continue rotating as needed until you are sick of rotating addresses.
AABBCCDDEEFF
BABBCCDDEEFF
CABBCCDDEEFF
DABBCCDDEEFF
If you're on Linux, we can use the macchanger tool, you may need to install this with sudo apt install macchanger.
# Stop Network Manager and take down the interface
systemctl stop NetworkManager.service
ifconfig wlan0 down

# Set random MAC address
macchanger -r wlan0

# Bring interface back up and start Network Manager
ifconfig wlan0 up
systemctl start NetworkManager.service
Stealing someone else's MAC Address
If there's no access at all until you pay/authenticate yourself then you can instead take the MAC address of someone else who has already paid.
Using airoddump-ng we can listen for other hosts that are connected/associated.
# Kill network manager/wpasupplicant
airmon-ng check kill
# Put wireless adapter in Monitor mode
airmon-ng start wlan1

# Use airodump to find other macs
# airodump-ng wlan1mon with no parameters will cycle through all wireless channels

# 2.4ghz
airodump-ng wlan1mon
# 5ghz
airodump-ng wlan1mon --band a

# Once you spot the channels your target SSID is hosted on we can listen on just that channel/s

# -a means only show associated (CONNECTED) clients
airodump-ng wlan1mon -a --essid SSIDNAME -c CHANNEL

# Turn off monitor mone
airmon-ng stop wlan1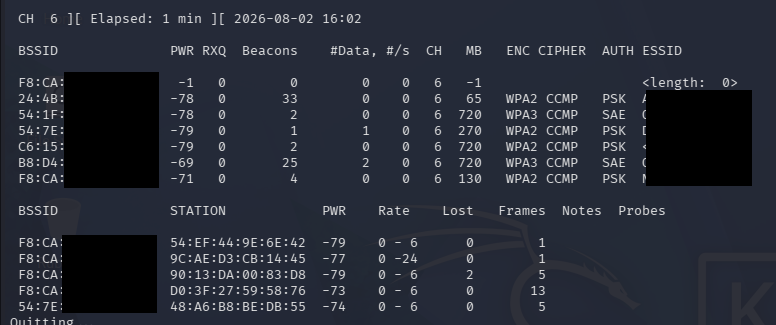
The bottom half of the output shows connected victims.
The BSSID is the MAC address of the wireless access point that the victim is connected to and the STATION is the MAC address of the victim.
Now we can change our MAC address to match one of the other connected users.
# Stop Network Manager and take down the interface
systemctl stop NetworkManager.service
ifconfig wlan0 down

# Change MAC
macchanger -m OTHERMAC wlan0

# Bring interface back up and start Network Manager
ifconfig wlan0 up
systemctl start NetworkManager.service

# Show you your current and permanent Mac address
macchanger -s wlan0

# Connect to the network as you normally would through the GUI and you should be past the captive portal
ICMP Tunnelling
ICMP and DNS tunnelling require you to have an internet accessible server/VPS setup.
A quick test to see if this will work at all is to ping 1.1.1.1 to determine if outbound ICMP traffic is permitted.
If it is, you may be in business and we can tunnel IP over ICMP.
 friedrich
Set it up on the server.
# On the server

# Compile
git clone https://github.com/friedrich/hans
cd hans
make

# Run Server
./hans -s 10.1.2.0 -p password

# This creates an interface with the IP 10.1.2.1 on the server. Subsequent clients will then end up in 10.1.2.0/24.
Now on your laptop we'll need to use Hans and some routing changes to tunnel traffic over ICMP.
# On your workstation

# Compile as you did on the server

# Run Hans client (server_adddress is the IP of your server)
./hans -c server_address -p password

# Route traffic through tunnel if the tunnel comes up
# Get the current default gateway and add a static route for it
DEFAULT_GW=$(ip route | grep '^default' | awk '{print $3}')
sudo ip route add server_address via "$DEFAULT_GW"

# Change default route to route traffic through ICMP tunnel
sudo ip route del default
sudo ip route add default via 10.1.2.1

# Revert
sudo ip route del defautl
sudo ip route add default via "$DEFAULT_GW"
If everything worked you should have internet.
If you're a network owner and wish to block this, simply block all ICMP traffic outbound.
DNS Tunnelling
Finally we have DNS tunnelling. This functionally works similarly to ICMP tunnelling. In addition to a server you'll also need your own domain name.
Do direct queries work? dig google.com @8.8.8.8 If yes, you should be able to continue with trying to set this up.
Alternatively, sometimes you may be able to resolve arbitrary domains dig google.com, If google.com doesn't resolve to a private address a DNS tunnel via recursive queries may be possible.
yarrick
Domain & Server Setup
Setup 2 DNS records for your domain.
- t1ns - A Record - server_address
- t1 - NS record - t1ns.your.domain
Then setup your server
# Server setup
sudo apt install iodine

# Start Iodine
IODINE_PASSWORD="PASSWORD"
IODINE_EXTERNAL_IP="server_address"
IODINE_IP="10.1.3.1"
IODINE_DOMAIN="t1.your.domain"
iodined -c -P "$IODINE_PASSWORD" -n "$IODINE_EXTERNAL_IP" "$IODINE_IP" "$IODINE_DOMAIN" &
Now we should be able to connect.
# On your laptop
./iodined -f -c -P PASSWORD server_address t1.mydomain.com

# Route traffic through tunnel if the tunnel comes up
# Get the current default gateway and add a static route for it
DEFAULT_GW=$(ip route | grep '^default' | awk '{print $3}')
sudo ip route add server_address via "$DEFAULT_GW"

# Change default route to route traffic through DNS tunnel
sudo ip route del default
sudo ip route add default via 10.1.3.1

# Revert
sudo ip route del defautl
sudo ip route add default via "$DEFAULT_GW"